
Knowing how to record your screen with both your microphone and system audio is a game-changer. You don't always need fancy software either. Windows has the Xbox Game Bar, and Macs have the Screenshot Toolbar built right in. If you need more firepower, a free tool like OBS Studio gives you a ton of professional features without the price tag.
Once you have this skill down, you can create anything from detailed tutorials and meeting archives to epic gameplay highlights, complete with all the sound.
Why Bother Recording Audio with Your Screen?
Have you ever tried to follow a software tutorial that was completely silent? The mouse just zips around, clicking on things, and you're left trying to guess what’s happening. It’s frustrating.
Adding your voice, the application's sounds, or both, provides the context that visuals alone are missing. This simple step elevates a basic screen capture into a genuinely useful communication tool.
Bringing Clarity to the Screen
Imagine walking a coworker through a new process. A silent video shows them what you clicked, but your voice explains why you clicked it. That narration adds personality and makes the whole thing much easier to digest.
This principle applies everywhere:
- Training and Tutorials: Guide new users through software with clear, step-by-step narration.
- Saving Important Calls: Keep a perfect record of team meetings, making sure no key decisions or discussions are lost.
- Making Presentations Pop: Record yourself narrating a slideshow to deliver your message with real impact and emphasis.
This isn't just a niche skill anymore. The global screen recording market was valued at a huge $9.58 billion in 2024 and is expected to climb to $10.92 billion by 2025. The shift to remote work and online learning is fueling this massive growth. You can dive deeper into the screen recording trends shaping the industry on Superagi.com.
Recording your screen with audio isn't just about capturing pixels; it’s about making your message land. It’s the difference between showing someone what you did and actually teaching them how to do it. That one addition makes your content more effective, memorable, and human.
Choosing the Right Screen Recording Tool for You
Not all screen recorders are created equal, and picking the right one upfront can save you a ton of headaches. Your best bet depends entirely on what you're trying to do—whether it's a quick, disposable clip or a polished video tutorial. Don't get hung up on finding one perfect tool for everything; focus on the best tool for the job at hand.
The good news? You probably already have a decent screen recorder on your computer. Modern operating systems from Microsoft and Apple now include built-in options that handle basic tasks surprisingly well. According to a report from Verified Market Reports, the demand for these tools has been growing steadily as more people need to share what's on their screen.
This visual guide can help you figure out which tool is right for your specific needs.
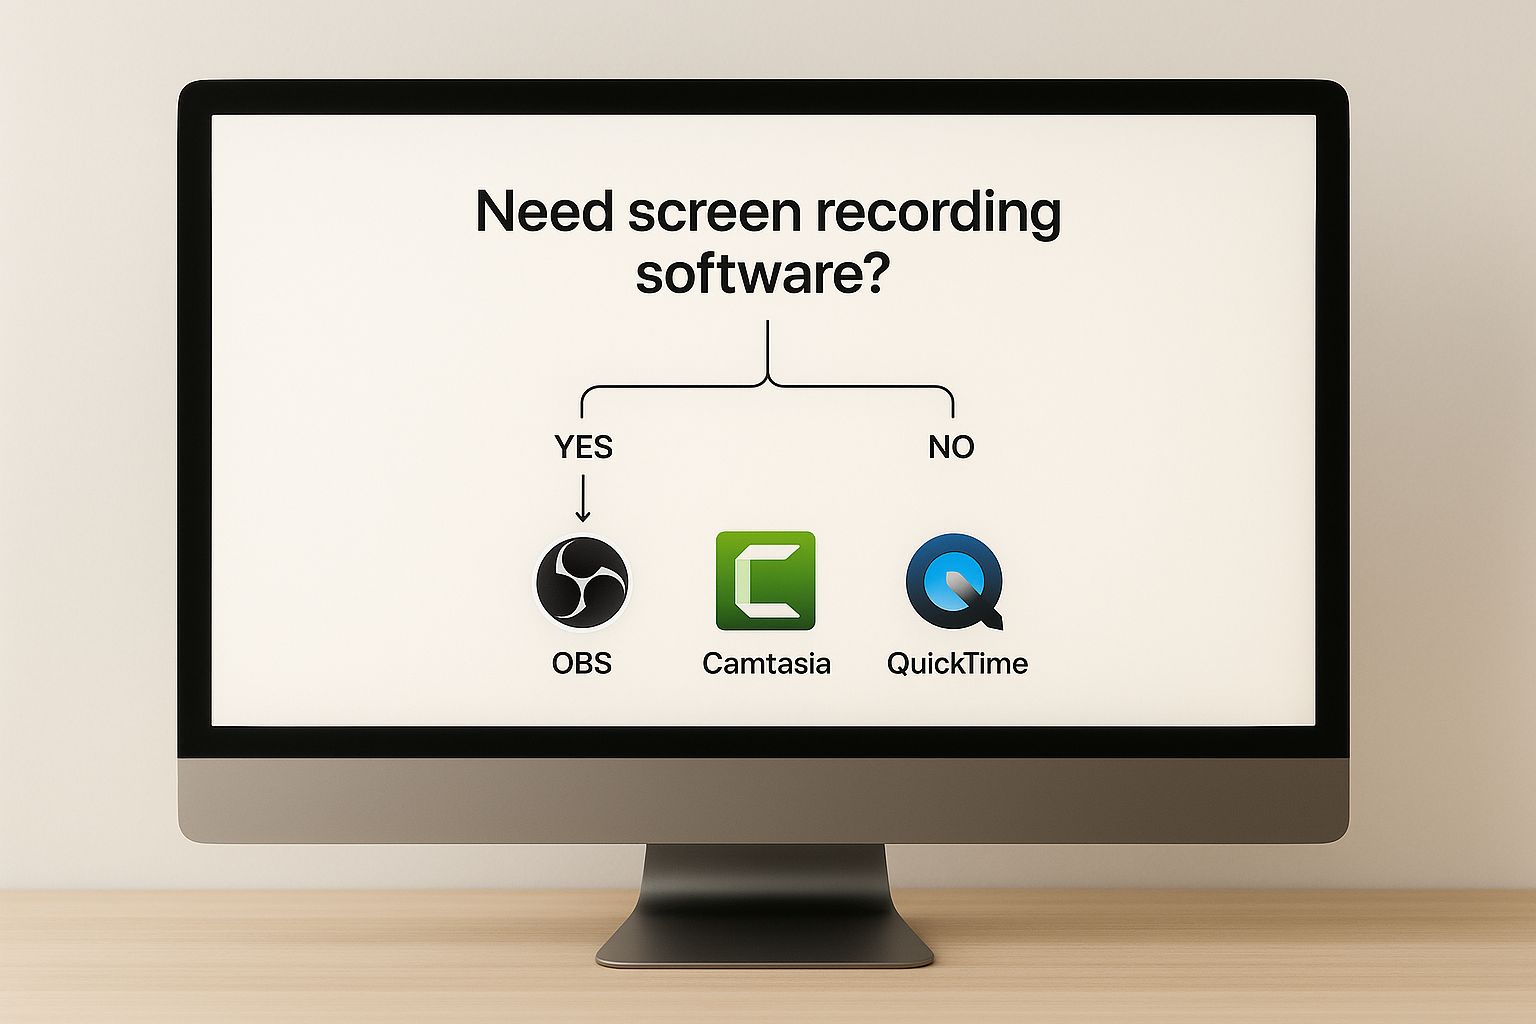
As you can see, you can quickly narrow down your options, whether you just need a simple built-in tool or something more powerful like OBS or Camtasia for more professional projects.
Built-in vs. Dedicated Software
So, when should you stick with the basics versus downloading something new? It really boils down to your end goal.
- Built-in Tools (Xbox Game Bar, Mac's Screenshot Toolbar): These are perfect for quick, no-fuss recordings that don't need any editing. Think about capturing a weird bug to send to IT or recording a short gameplay clip to share with friends.
- Free Dedicated Software (OBS Studio): This is the go-to when you need more control but don't have a budget. OBS is a powerhouse for live streaming or recording multiple sources at once, like your screen, your webcam, and a specific application window.
- Paid Professional Software (Camtasia): It's worth the investment if you're creating polished training videos or course content. These programs combine a powerful recorder with an intuitive video editor, giving you an all-in-one solution. Our guide to the best screen recording software with voiceover capabilities dives deeper into some great paid options.
Ultimately, the best tool is the one that fits your workflow. My advice is to always start with what's already built into your computer. If you find yourself hitting a wall and needing more features, like robust editing or streaming options, then it’s time to explore dedicated software.
Screen Recording Tool Comparison
To help you decide, here's a quick breakdown of the different types of tools available. Think of this as a cheat sheet to match your needs with the right software category.
| Tool Type | Best For | Cost | Key Features |
|---|---|---|---|
| Built-in OS Tools | Quick, simple recordings; bug reports; informal how-to's | Free | Basic recording, screen + mic audio, no editing, instant access |
| Freeware (OBS Studio) | Live streaming, complex recordings with multiple sources (webcam, windows) | Free | High customization, streaming integrations, advanced audio mixing, steep learning curve |
| Paid Software (Camtasia) | Professional tutorials, training materials, marketing videos | Paid | Integrated video editor, templates, annotations, transitions, tech support |
Choosing the right tool from the start makes the whole process smoother. If you just need to show a colleague how to do something, the tool built into your Mac or PC is perfect. But for a public-facing tutorial, investing in a paid tool with a good editor will give you that professional polish.
How to Record Your Screen on Windows
If you're on a Windows machine, you've already got a surprisingly capable screen recorder built right in. No downloads, no fuss. It’s called the Xbox Game Bar, and despite its name, it’s not just for gaming. It’s perfect for capturing tutorials, presentations, or just about any app on your screen.
Getting started is as simple as hitting the Windows key + G on your keyboard. This command instantly pulls up the Game Bar overlay. Look for the "Capture" window—it usually pops up in the top-left corner, and that's where the magic happens.
Capturing Your Screen and Audio
Before you jump in, take a quick look at your audio settings within that Capture window. You'll spot a little microphone icon. Just click it to turn your mic on or off. This makes it incredibly easy to add commentary to your recordings on the fly.
What’s great is that the Game Bar automatically grabs your system audio—the sounds coming from your applications, videos, or notifications. This means you don't have to mess with any complicated settings to capture the audio from a presentation or a software bug you're trying to demonstrate.
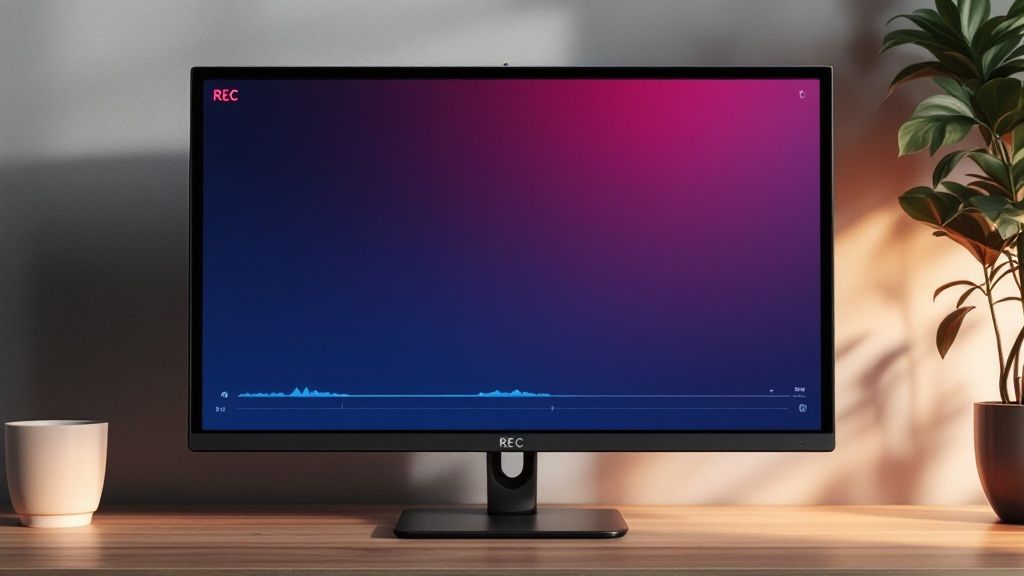
Here's what that straightforward interface looks like:
When you’re set, just hit the big record button. Or, for an even quicker start, use the shortcut Windows key + Alt + R.
Once you stop recording, Windows automatically tucks the video file away. You can find it in your "Videos" folder, inside a subfolder named "Captures." The process is so simple that you can even use it to https://blog.screendesk.io/record-video-call/ with minimal effort, making it a handy tool to have in your back pocket.
For quick, no-nonsense recordings on Windows, the Xbox Game Bar is your best friend. It’s the ideal tool when you just need to capture a single app with both your voice and system sounds, without having to install a thing.
Keep in mind, the Game Bar does have its limits. It won't let you record your desktop or the File Explorer. If you need to show multiple programs at once or want more advanced features like live streaming, it’s worth checking out a more powerful free tool like OBS Studio. It offers a ton more control for those bigger projects.
How to Capture Your Screen on a Mac
If you're a Mac user, you're in luck. You already have a fantastic screen recording tool hiding in plain sight, built right into macOS. It’s surprisingly powerful for something that comes pre-installed, and a simple keyboard shortcut gets you started in seconds.
Just hit Command + Shift + 5. This little-known combo brings up the Screenshot Toolbar, which is your command center for both screenshots and screen recordings. No downloads, no fuss.
Using the Screenshot Toolbar for Audio Recordings
When the toolbar pops up at the bottom of your screen, you’ll see options to record your entire display, a specific window, or a custom area you can drag to select. Once you've picked what you want to capture, the next step is getting your audio sorted.
Look for the "Options" button on the toolbar. This is where the magic happens. A dropdown menu will appear, and under the Microphone section, you can select your audio source. You can use your Mac's built-in mic or, for better quality, plug in an external USB microphone and choose it from the list.
It's a clean, straightforward interface that puts all the key settings right where you need them.
The "Options" menu is also where you can set a timer, which is handy if you need a few seconds to get your windows arranged before the recording kicks off.
But there's a catch, and it's a common one that trips people up: macOS doesn't natively record the computer's internal audio. This means your voiceover will be clear, but any sounds from your applications or browser tabs won't make it into the final video.
This is probably the biggest headache for Mac users trying to screen record. Capturing your voice is easy, but recording the audio from a YouTube video or a software tutorial requires a simple workaround.
Recording Internal Computer Audio
To get around this limitation, the go-to solution is a free, open-source tool called BlackHole. It works by creating a virtual audio device that cleverly routes your Mac's internal sound back into the recording.
Getting it set up is pretty quick. Here’s the process:
- First, download and install BlackHole.
- Next, open the Audio MIDI Setup app (you can find it using Spotlight).
- Click the + icon in the bottom-left corner and create a Multi-Output Device.
- In that new device, check the boxes for both your normal output (like your speakers or headphones) and BlackHole. This lets you hear the audio while it's being recorded.
- Finally, when you bring up the Screenshot Toolbar (Command + Shift + 5), go to Options and select BlackHole as your microphone.
With that simple tweak, you can now record your screen with audio from any source—your mic, your apps, or both. You’ve just turned a basic utility into a complete recording solution, all without spending a dime.
Tips for High-Quality Audio and Video
You can have the most helpful content in the world, but if the video is blurry and the audio is a mess, your audience will tune out. Knowing the basic steps to record your screen is a great start, but a few simple tweaks can make your recordings look and sound polished and professional.
Getting these little details right will elevate your screen recordings from just okay to genuinely great.
Elevate Your Audio Quality
Let’s be honest: your computer's built-in microphone just isn't very good. It's fine for a quick call, but for a recording, it captures every keyboard click and the whir of your computer's fan, making you sound distant and unprofessional. The single biggest upgrade you can make is investing in an external USB microphone. You don't need a thousand-dollar setup; even a simple one will make a world of difference.
Before you press record, find the quietest spot you can. Shut the door, turn off any fans or air conditioners, and silence your phone. You'd be surprised how much background hum a microphone can pick up.
My number one rule: Always do a quick test recording. Seriously. Just record 30 seconds of yourself talking while some system audio plays. Listen back with headphones. This simple check has saved me from having to re-record an entire hour-long tutorial more times than I can count.
Sharpen Your Video Presentation
When it comes to your visuals, think clean and focused. Before you start, close every single application, tab, and notification that isn't essential for your recording. It prevents distracting pop-ups and frees up your computer's processing power, which helps ensure a smooth, lag-free video.
If your face will be on camera, lighting is everything.
- Face the light. Your main light source, whether it's a window or a lamp, should be in front of you, not behind you. This avoids that dreaded silhouette effect.
- Record in high definition. Always aim for at least 1080p. It gives you a crisp, clear image that’s much easier for people to watch and follow.
The need for good screen recordings has really exploded. Before 2015, it felt like a niche skill, but with the rise of remote work and online learning, it’s become essential. If you're running into issues with capturing specific application sounds, our guide on screen recording with internal audio has some more targeted solutions.
Common Questions About Screen Recording
After you get the hang of the basics, a few common questions always seem to surface. Knowing the answers ahead of time can save you a lot of grief and help you create much better videos from day one.
Can I Record My Screen and Webcam at the Same Time?
You absolutely can, and you definitely should for a lot of projects. Most screen recorders are built to do this right out of the box. It’s how you get that classic picture-in-picture look, with your face in a little bubble in the corner. This is perfect for adding a human touch to tutorials or walking someone through a presentation.
- Tools like OBS Studio and Camtasia give you a ton of control over where your webcam feed goes and how big it is.
- Even the built-in Xbox Game Bar on Windows has a simple option for capturing your webcam feed.
Honestly, it’s one of the best ways to connect with your viewers. Seeing your expressions makes the content way more engaging.
Why Is My Screen Recording File So Big?
Ah, the giant file size problem. We've all been there. A short 10-minute video suddenly takes up several gigabytes. This usually boils down to a few culprits: recording at a super high resolution, using a high frame rate, and the sheer length of the video.
The biggest offender is almost always recording in 4K when 1080p would have looked just fine. High-quality video doesn’t have to mean gigantic files.
Here are a few tweaks I always make to keep my file sizes reasonable without making the video look bad:
- Stick to 1080p (1920×1080). It's the gold standard for a reason—clear enough for any screen, but won't clog up your hard drive.
- Record at 30 FPS. Unless you're recording fast-paced gaming, 30 frames per second is perfectly smooth for most tutorials and presentations. This one change can cut your file size almost in half compared to 60 FPS.
- Compress it afterward. If the file is still a monster, run it through a free tool like HandBrake. It works wonders at shrinking videos with very little noticeable quality loss.
How Do I Edit My Screen Recording?
You don't need to be a Hollywood editor for most screen recordings. If all you need to do is snip off the awkward silence at the beginning and end, the tools you already have are probably enough. The Photos app on Windows and iMovie on Mac are surprisingly capable for simple trims.
But if you want to get a bit fancier—maybe add some text callouts, smooth transitions, or cut out a mistake you made halfway through—you'll need a dedicated video editor. DaVinci Resolve is an incredible free option with professional-level tools. For the most control, paid software like Adobe Premiere Pro is the industry standard.
Ready to streamline your customer support with crystal-clear video? Screendesk makes it easy to create and share screen recordings directly from your helpdesk, resolving issues faster and delighting your customers. Learn more and get started at Screendesk.io.