
Before you hit that "Create" button, let's talk about what a Jira issue actually is. I like to think of it as the basic DNA of any project. It's the smallest, most fundamental piece of work, whether that's squashing a tiny bug or kicking off a massive marketing campaign.
Getting this first step right—creating the issue properly—is what sets the stage for a smooth, transparent workflow. Mess it up, and you're in for a world of confusion down the road.
Why Every Jira Issue Matters
In Jira's world, an "issue" is just a neat little package of information representing one single thing your team needs to do. This could be a task, a bug report, a request for a new feature, or an idea for an improvement. When you define it clearly from the get-go, you ensure every piece of work is tracked from start to finish. No more tasks falling through the cracks.
This simple concept is why Jira dominates the project management space. It's used on over 42,000 websites across the globe, with massive adoption in places like the United States and India. This isn't just a random stat; it shows how essential structured issue tracking is for teams trying to get things done. You can dig into more of the numbers on Jira's market presence and user statistics.
Take a look at the interface below. This is where the magic happens—teams organize all those individual issues into clear, visual boards.
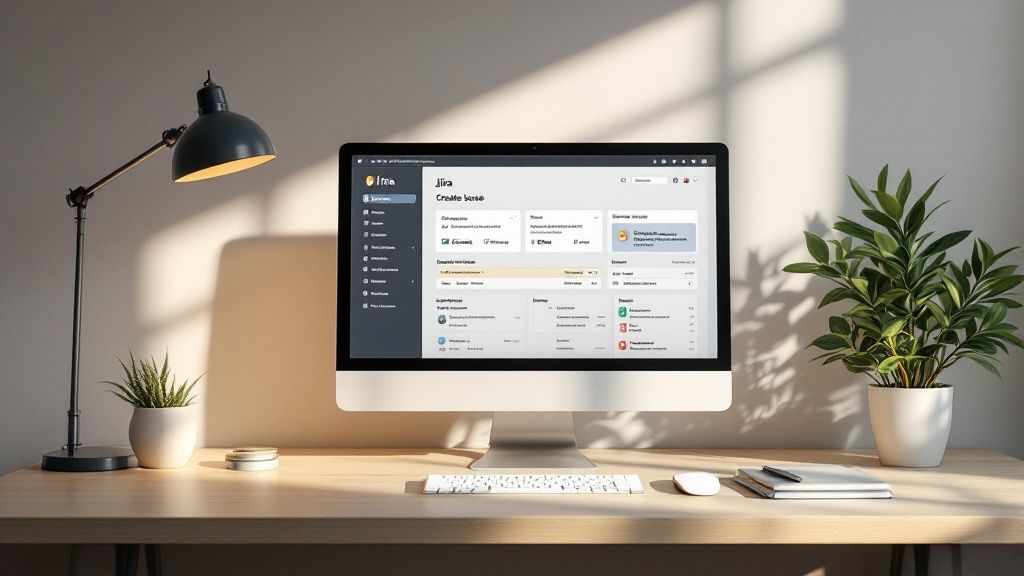
This visual workflow is precisely why a well-defined issue is so critical. Every ticket you create feeds directly into this system, making progress visible and keeping everyone on the same page.
The Anatomy of a Jira Issue
To really nail this, you need to understand the handful of core components that make up any issue. Think of them as the essential details that give a task its identity and direction. They are the first things you'll define when you create a new ticket.
Let's break them down. The following table covers the absolute must-knows for every Jira issue you'll ever create.
Core Components of a Jira Issue
| Component | Its Purpose | Why It's Important |
|---|---|---|
| Project | The "home" for your issue. It's the high-level container, like "Mobile App V2" or "Website Redesign." | Puts the work in front of the right team and ensures it follows that team's specific process (workflow). |
| Issue Type | The category of work. Common examples are Bug, Task, Story, or Epic. | Helps with filtering, reporting, and prioritizing. A Bug gets different attention than a New Feature. |
| Summary | A short, clear headline for the issue. This is what everyone sees on the board. | It needs to be instantly understandable. "Login button broken on iOS 15" is a great summary. |
| Description | The details. This is where you explain the "what" and "why" of the task. | A good description gives a developer or team member all the context they need to start working without asking questions. |
| Assignee | The person responsible for doing the work. | This creates clear ownership. Everyone knows who is accountable for moving the issue forward. |
| Reporter | The person who created the issue. | This tells the team who to go to with questions. It's often you! |
These components are the bedrock of good issue tracking. Fill them out thoughtfully, and you’re already halfway to a successful task.
A Quick Tip from Experience: Getting the Project and Issue Type correct from the start is 90% of the battle. It ensures the right people get notified and that Jira shows you the specific fields needed for that type of work. Everything flows from these two choices.
Finding and Using the Create Issue Screen
Ready to create your first Jira ticket? It all starts with the big Create button. You can’t miss it—it’s usually sitting right in the main navigation bar at the top of your screen. No matter where you are in Jira, that button is your launchpad for logging any new piece of work.
But the real thinking starts the moment you click it. Before you can add a summary or description, Jira will immediately ask for two things: the Project and the Issue Type. These first two choices are everything; they control the entire path your ticket will follow from creation to completion.
This is the standard flow you'll follow every single time.
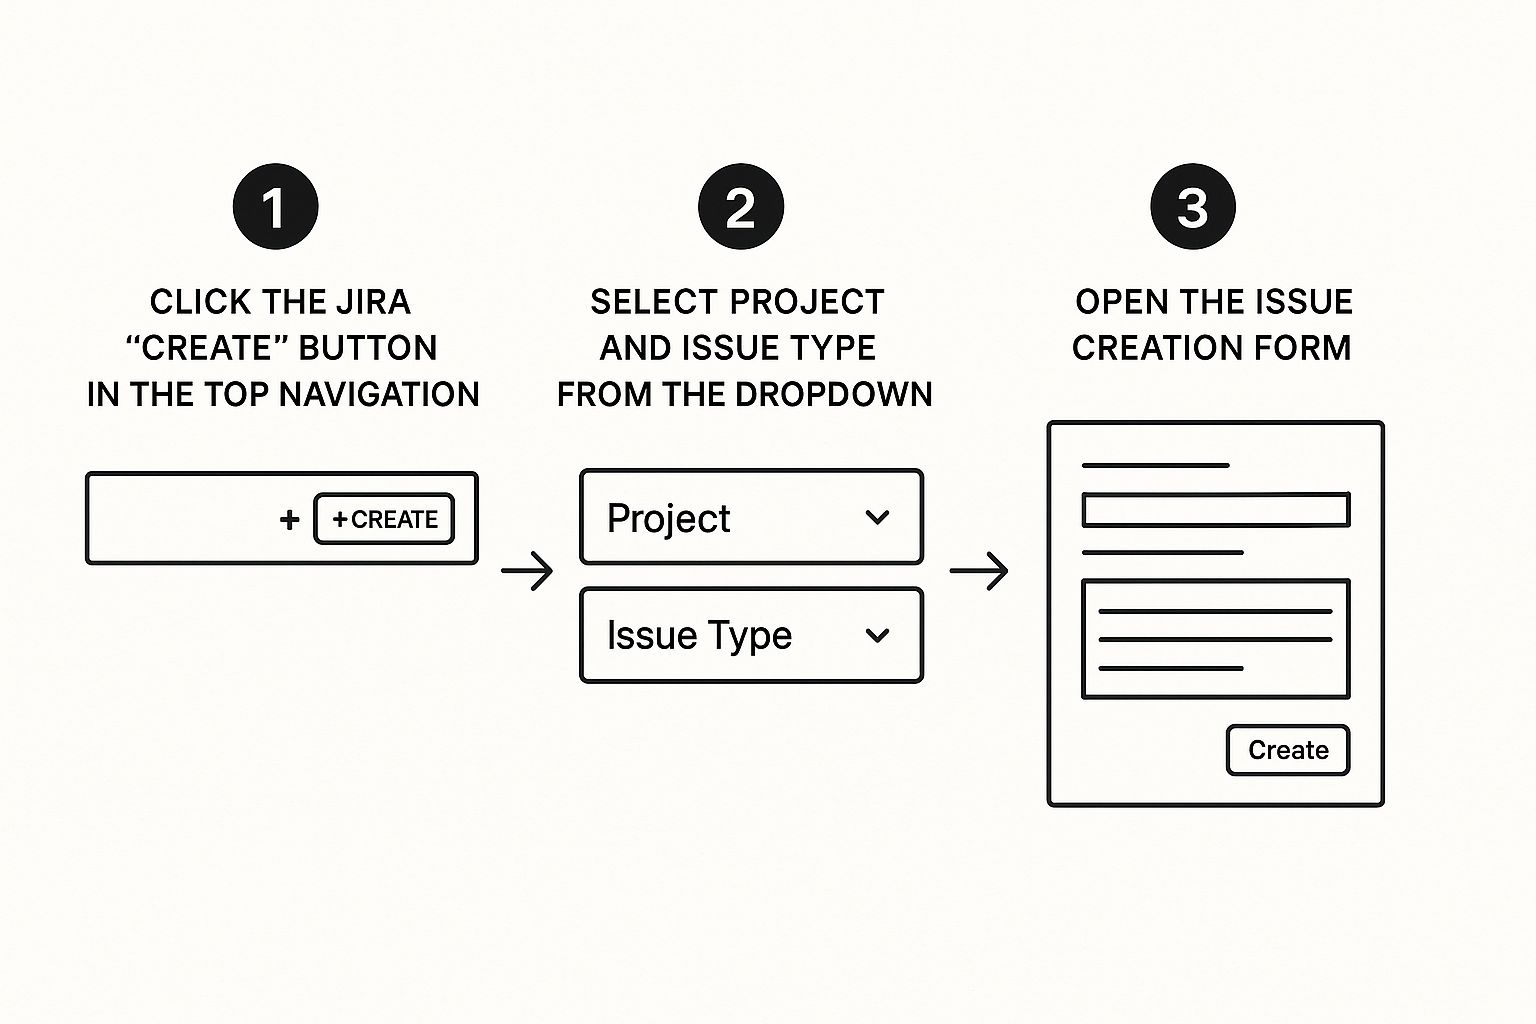
As you can see, getting the project and issue type right from the jump is the most important part of the process. Everything else stems from that decision.
Choosing Your Project and Issue Type
First up is the Project. This seems obvious, but it’s easy to get wrong. Picking the right project ensures your ticket lands in the correct team’s court. If you’re logging a bug for the mobile app, you need to select the "Mobile App Development" project, not the "Marketing Campaigns" one. A misplaced ticket is a lost ticket.
Next is the Issue Type. This defines the kind of work you’re creating. It’s what tells Jira which fields to show you and which workflow to apply.
Think of it this way: A Bug in a development project needs a "Steps to Reproduce" field. A Task for the marketing team probably needs a "Campaign Due Date" field. The Issue Type is what makes that distinction possible.
After clicking Create, you'll see a simple pop-up asking for these two details first. Getting them right here sets your ticket up for success before you've even typed a single word of the description. It’s the foundation for an effective, actionable ticket that your team can actually work on.
Filling Out the Essential Details
After picking your project and issue type, you'll land on the main ticket screen. This is where the magic happens—turning a vague thought into a clear, actionable task for your team. A Jira issue is only as good as the information inside it, so getting this part right is everything.

Think of it this way: you wouldn't send someone on a road trip with a blank map. The details you provide here are the turn-by-turn directions your team needs to get the job done.
Nailing the Summary and Description
The Summary is your ticket’s headline. Keep it short, specific, and something you could easily search for later. Instead of a vague "Login is broken," try something like "User cannot log in with Google SSO on iOS." Right away, the team knows the problem, the feature, and the environment.
The Description is where you lay out the full story. Don't just toss in a single sentence and call it a day. A little formatting goes a long way in making it easy to read.
- Use bullet points to list out the steps to reproduce a bug.
- Add bold headings to break up different chunks of information.
- Drop in links to any relevant designs, documents, or screenshots.
For bugs, a detailed description is non-negotiable. A good structure prevents a ton of back-and-forth questions and lets your team get straight to work. If you need a solid starting point, this guide on creating an effective bug report template is a lifesaver: https://blog.screendesk.io/bug-report-template/
My Two Cents: Treat the Description field like a mini-brief. The goal is to give the assignee everything they need to start working without having to hunt you down for clarification. It saves everyone time and headaches.
Picking the Right Priority and Assignee
Okay, now it’s time to route the ticket. The Assignee is the person who owns the next step. If you know exactly who should tackle the task, assign it directly. If you’re not sure, it's often better to leave it unassigned. That way, a team lead or project manager can triage it properly. Guessing wrong just adds noise and slows things down.
The Priority field signals how urgently the issue needs to be addressed. This isn't just busywork; it's how teams decide what to focus on next. It’s interesting to see how this plays out in the real world—data from Jira projects often shows that about 68% of issues are marked as 'Major,' while true 'Blocker' issues are rare, making up only about 2%. It shows how critical priority levels are for managing the team's workload.
Setting these two fields correctly ensures your ticket lands on the right person's radar with the right sense of urgency. It’s a small step that makes a huge difference in keeping your projects on track.
Bringing Your Jira Issues to Life with Richer Context
Alright, you've got the basics down. But a great Jira ticket is more than just a title and description—it's a living document that tells a complete story. This is where you add the extra details that prevent those endless back-and-forth clarification questions and keep your team moving forward.
Think of these "advanced" features as your secret weapons for clarity. When you use them right from the start, you give everyone the full picture, which is something a simple summary just can't do on its own.
Connecting the Dots: Linking Issues and Creating Sub-Tasks
One of the most powerful things you can do in Jira is show how different pieces of work relate to each other by linking issues. This is crucial for visualizing dependencies. Maybe one task is blocking another from starting, or two different bugs are related to the same faulty feature. Linking them creates an easy-to-follow breadcrumb trail for anyone who picks up the ticket.
For bigger jobs, you need to break them down. That’s where sub-tasks come in. Let's say you have a Story for building a new user profile page. That’s a huge task! So you’d create sub-tasks like:
- Design the UI mockups
- Build the front-end components
- Create the back-end API endpoints
- Write automated tests
This turns a giant, intimidating goal into a clear, actionable checklist. Everyone knows exactly what needs to be done, which makes tracking progress a breeze.
Here's a tip I learned the hard way: always create your sub-tasks right after creating the parent story. It forces you to think through the entire workflow upfront and stops critical steps from being missed when you're in the middle of a busy sprint.
Making Work Discoverable with Labels and Attachments
Labels are your best friend for categorization. They’re essentially searchable tags you can slap onto any issue. This is incredibly useful for grouping work that might be scattered across different projects or epics.
For example, you could create a label like 2024-product-launch to tag every single ticket involved, from marketing copy to backend development. Now, you have a one-click way to see everything related to that launch.
And please, don't forget about attachments. A screenshot of a bug is infinitely more helpful than a long paragraph trying to describe it. A short screen recording of a confusing user flow can save an hour-long meeting. Got a project brief or a design file? Attach it directly to the ticket. It provides instant, undeniable context and saves everyone a ton of guesswork.
Best Practices for Creating Effective Issues
Anyone can create an issue. The real skill is creating one that your team can actually act on without a dozen follow-up questions. Adopting a few good habits can turn your tickets from simple reminders into powerful communication tools, making the whole process to create an issue in Jira smoother for everyone.
Before you even hit that "Create" button, take a moment to search the backlog. Seriously. A cluttered board full of duplicate issues is one of the quickest ways to slow a team down. A quick 30-second search for keywords can save hours of wasted work and keep the team focused on what matters.
Streamline Your Workflow
For tasks that come up all the time, like bug reports or new feature requests, templates are your best friend. They create a standard format, ensuring all the critical details are there from the start. A good bug report template, for example, will always ask for the browser version, steps to reproduce, and the expected vs. actual results.
If you want to build a solid template, you can find some great guidance here: https://blog.screendesk.io/jira-bug-report/
Another simple but powerful habit is using @mentions with purpose. Don't just tag the whole team and hope for the best. Instead, mention specific people in the comments to ask a direct question or get their eyes on a particular detail. This cuts through the notification noise and gets the right person involved quickly.
Pro Tip: When you create an issue in Jira, think of it as starting a conversation. Your goal is to provide enough clear, concise information so the next person can pick it up and run with it without needing to ask for more context.
Finally, don't forget to lean on modern tools. Atlassian's own AI features can now create Jira tickets straight from your meeting notes. For example, HarperCollins cut down their manual project setup work from an hour to just 15 minutes by automating ticket creation this way.
Have a Question About Creating a Jira Issue?
Even with a clear process, a few questions always seem to pop up when you're creating issues in Jira. Let's walk through some of the most common ones I've seen teams struggle with.
Why Can't I Create an Issue?
This is probably the number one question. You go to log a bug, but the "Create" button is grayed out, or you can't even find the project you're looking for in the dropdown. 99% of the time, this is a permissions problem.
Instead of getting frustrated trying to figure it out yourself, your best bet is to ping your Jira administrator. They can quickly check your access and grant you the "Create Issues" permission for the right project. It's the fastest way back on track.
What if I Mess Up an Issue I Already Created?
It happens. You might forget to add an attachment or realize you assigned it to the wrong person. Fixing it is simple: just open the issue and click directly on the field you want to change.
What if you need to get rid of it completely, like if it's a duplicate? You can find a "Delete" option under the "Actions" menu (look for the three-dot icon).
A word of caution, though: deleting is permanent. It can mess up your team's metrics and break links with other issues. A better practice is to change the issue's status to something like "Won't Do" or "Duplicate" and close it. This keeps a record of what happened without erasing the history.
I've heard people call them "issues," "tickets," and "tasks." Honestly, what you call them doesn't really matter. What does matter is that everyone on your team understands what information needs to be included.
To keep everyone on the same page, creating a simple guide for your team can work wonders. If you need a starting point, check out this fantastic issue reporting template for ideas on how to structure your own.
Here are a few other common questions I often hear.
Frequently Asked Questions
| Question | Answer |
|---|---|
| Can I create sub-tasks within an issue? | Yes, if your project is configured for it. Look for the "Create sub-task" option in the issue view. It's a great way to break down larger pieces of work. |
| How do I link one issue to another? | In the issue view, find the "Link issue" option. You can then search for another issue and define the relationship (e.g., "blocks," "is blocked by," "relates to"). |
| What's the difference between "Priority" and "Severity"? | Priority is about scheduling—how soon should we work on this? Severity is about impact—how much does this bug affect the system? They're related, but not the same. |
| Can I add watchers to an issue? | Absolutely. Adding "watchers" keeps them notified of any updates. Just find the "Watchers" section and add the relevant team members. |
Hopefully, that clears up some of the common sticking points you might run into.
Ready to make your customer support even better? Screendesk integrates with your helpdesk to let you resolve issues faster with screen recordings and live video support. Start your free trial today.