
Before you even think about hitting the record button or opening up your editing software, the real work begins. The secret to a great training video isn’t just about fancy cameras or slick graphics; it’s about making sure the video actually achieves something. This first phase is all strategy.
Define Your Training Goals Before You Press Record
Diving into filming without a clear purpose is a recipe for disaster. It’s like setting off on a road trip with no destination in mind—you might end up with some pretty footage, but it won’t teach anyone anything or solve the problem you set out to fix.
The foundation of any successful training video is knowing exactly what you want your audience to know, feel, or do after they’ve watched it. That’s why the very first step is to lock down your goals, using solid goal setting frameworks to guide you. This ensures every decision you make, from the script to the final cut, has a clear purpose.
Start With a Needs Analysis
Before setting goals, you have to understand the gap you're trying to fill. A needs analysis is your chance to play detective and figure out what the real knowledge or skill gaps are. Don't just assume you know what the training should be about.
Get out there and talk to people. Interview managers about performance issues on their teams. Ask employees about their biggest daily hurdles. Where is the confusion happening? What mistakes are being made over and over?
You might discover that what seems like a "training problem" is actually a broken process. For instance, maybe the team isn't struggling with the entire new CRM. Maybe they just need a quick, two-minute video clarifying the lead qualification criteria. The analysis points you directly to the source of the pain.
Set Sharp, Measurable Learning Objectives
Once you know the problem, you can create your learning objectives. Vague goals like "get better at the software" are completely useless. You need to get specific.
A weak objective sounds like this:
- "Train employees on the new expense reporting software."
A much stronger, measurable objective is crystal clear:
- "After watching this 5-minute video, employees will be able to submit a fully compliant expense report with zero errors in under 10 minutes."
See the difference? This gives you a roadmap. It tells you exactly what to include in the video and, just as importantly, what to leave out. Your video becomes focused and ruthlessly efficient.
The most effective training videos are surgical. They target a specific, well-defined problem with a clear, actionable solution. Every second of footage should be dedicated to achieving that single, measurable objective.
Get to Know Your Audience
Who, exactly, are you making this for? The answer changes everything—the tone, the language, the pacing, even how complex you can get. A video for a fresh batch of new hires looks completely different from one made for senior engineers.
Think about a few key things:
- What do they already know? Are they total beginners who need the basics, or are they pros just learning one new feature? You'll bore experts to tears if you start from square one.
- What’s their job? Frame the training around their specific, day-to-day tasks. Make it immediately obvious how this will help them do their job better.
- How tech-savvy are they? A video for a non-technical sales team needs to be simple and jargon-free. You can get more technical with an IT crowd.
For example, an onboarding video for new marketing folks might be upbeat and focus on high-level workflows. But a security update for the IT department? That’s going to be formal, direct, and packed with technical details. When you tailor the video to the viewer, the message actually lands and the learning sticks.
Scripting and Storyboarding for Engagement

Alright, you’ve figured out what you need to teach and who you’re teaching. Now comes the fun part: turning those ideas into a story that actually sticks. The real secret to a video that people will watch all the way through isn't fancy editing—it's a solid script and a clear visual plan.
Getting this pre-production phase right saves you a world of headaches later. Trust me, it’s the difference between a smooth shoot and endless, costly reshoots. A well-written script is the absolute backbone of your entire training videos production process. Without it, it’s easy to ramble, forget crucial points, or end up with a final cut that’s just a confusing mess.
Crafting a Script That Connects
We’re not writing an academic paper here; we’re starting a conversation. The goal is to write a script that sounds completely natural when spoken. You want to break down complex topics into simple, digestible bites that genuinely connect with your audience.
I find it’s always best to structure the script with a clear beginning, middle, and end.
- The Hook: You have about 10 seconds to grab someone's attention. Start by hitting on a common problem or spelling out the awesome skill they’re about to learn.
- The Core Content: This is the meat of your training. Break down the information into logical steps or modules. Keep each section focused on one key idea.
- The Wrap-up: Don’t just end abruptly. Quickly recap the most important takeaways and give them a clear next step, like, "Okay, now it’s your turn to create your first report."
The key is to write like you talk. Use contractions. Ask rhetorical questions. Address the viewer directly as "you." This makes the whole experience feel more like a one-on-one coaching session than a boring lecture. For a deeper look into this process, our full guide on how to create training videos is packed with more strategies.
From Words to Visuals with Storyboarding
Once you’re happy with the script, it's time to think visually. That's where storyboarding comes in. A storyboard is basically a comic-strip version of your video. It maps out what each shot will look like, and no, you don't need to be an artist—stick figures work just fine.
This simple exercise forces you to plan how the visuals will support your words before you ever hit record. It’s where you’ll decide things like:
- Shot Composition: Will you show a close-up of the speaker, a wide shot of the workspace, or a screen recording of the software?
- On-Screen Graphics: Where should text pop up to highlight a key term? When will you use an arrow or a circle to draw attention to something on the screen?
- Animations and B-Roll: Do you need to cut away to other footage (B-roll) to illustrate a point or just to keep things visually interesting?
A detailed storyboard is your best friend during filming and editing. It eliminates guesswork, keeps your production efficient, and guarantees that the final visuals directly support and enhance the script's message.
For instance, if your script says, “Now, click on the Reports menu,” your storyboard might show a simple sketch of the software interface with an arrow pointing to that exact button. This ensures you get all the shots you need the first time around.
A Practical Scripting Workflow
To keep everything straight, I swear by a simple two-column script format. It connects the visuals and the audio right from the start and makes building the storyboard a breeze.
| Visuals (What the audience sees) | Audio (What the audience hears) |
|---|---|
| Close-up on presenter, smiling. | "Hi everyone! In this video, we're going to solve the biggest headache in expense reporting." |
| Screen recording of the software's main dashboard. | "First, let's log in and head over to the main dashboard. This is your home base for everything." |
| Zoom in on the 'New Report' button with a red circle animating. | "You'll want to click the 'New Report' button in the top right corner. Let's do that now." |
| Shot of a physical receipt being scanned by a phone. | "Remember, you can also add receipts on the go using our mobile app, which makes things much faster." |
This simple table ensures that for every line spoken, you have a visual element planned to go with it. When you take the time to nail down your script and storyboard, you’re not just planning—you're setting yourself up for a smooth, efficient production and a final video that actually works.
Choosing Your Gear and Setting the Scene

Let's be honest, the technical side of making a video can feel overwhelming. But here's the good news: you don't need a Hollywood budget or a truck full of gear to create professional-looking training content. A few smart choices in key areas will give you a polished result without breaking the bank.
It all starts with focusing on what actually impacts the viewer's experience. Believe it or not, the camera in your pocket is probably good enough to get started. Modern smartphones shoot incredible video, and popping one on a simple tripod is all you need for a crisp, steady shot.
The real secret weapon isn't your camera—it's your audio.
Prioritize Crystal-Clear Audio
Think about it. You might forgive a video that’s a little grainy, but you’ll click away in a heartbeat if the sound is muffled, echoey, or full of background noise. Bad audio screams "amateur," and your laptop's built-in microphone just isn't up to the task.
If you make one upgrade, make it an external microphone. It’s the single biggest leap in quality you can get for your money.
A few great, budget-friendly options to consider:
- USB Microphones: These are perfect for recording voiceovers or screencasts right at your desk. They plug straight into your computer and deliver a massive improvement in clarity.
- Lavalier (Lapel) Mics: These tiny mics clip right onto your shirt. They stay close to the source of your voice, ensuring consistent, clear sound even if you move around. They’re fantastic for any on-camera presentation.
Whichever you pick, always do a quick soundcheck before you hit record. That one minute of testing can save you the headache of re-recording an entire session.
Master Simple and Effective Lighting
Good lighting is what separates a flat, boring shot from one that looks dynamic and professional. Again, you don't need a complex studio setup. The goal is simple: eliminate distracting shadows and make sure your face or subject is clearly and evenly lit.
The gold standard here is a simple three-point lighting setup. It’s a classic for a reason.
- Key Light: This is your main and brightest light, positioned slightly to one side of your camera.
- Fill Light: Placed on the opposite side, this softer light "fills in" the shadows created by your key light.
- Back Light: This one goes behind you, creating a subtle outline that separates you from the background and adds a sense of depth.
You can pull this off with a couple of inexpensive LED panels or even just by getting creative with lamps you already have. A well-lit scene instantly makes your video feel more credible.
Prepare Your Recording Space
Finally, take five minutes to prep your environment. This tiny step has a huge impact on both your video and audio quality. You're aiming for a clean, quiet, and distraction-free zone.
First, think about sound. Rooms with soft surfaces—carpets, curtains, even a few pillows—are great because they absorb sound and kill that annoying echo. Don’t forget to turn off fans, air conditioners, and silence your phone notifications.
Next, look at what’s behind you. A cluttered or busy background pulls focus away from you and your message. A clean wall, a tidy bookshelf, or a simple branded backdrop works perfectly. Just make sure there’s nothing in the shot that will make your viewer's eyes wander.
This preparation is so important because it directly impacts how much your learners absorb. Research shows that video can boost engagement and knowledge retention by 65%, and 94% of video marketers say it improves user understanding. But that only happens if the video is easy to watch and hear. You can dig into more video marketing statistics to see the full picture.
The most important takeaway is this: great audio and good lighting are more critical than an expensive camera. By focusing your budget and effort on these two areas, you can create training videos that look and sound impressively professional.
Bringing Your Vision to Life in Filming and Editing
With your script and storyboard locked in, it's time to roll up your sleeves and move from planning to doing. This is where the magic happens—where words on a page become a powerful learning tool. All that careful prep work you did? It's about to pay off big time, making the filming and editing process a whole lot smoother.
Honestly, the success of your entire training videos production really comes down to how well you execute this stage. Whether you’re standing in front of a camera or simply recording your screen, the goal is always the same: capture clear, engaging footage that nails your learning objectives.
Mastering the Art of Recording
Let's be real, recording can be a bit nerve-wracking. But confidence comes from preparation. Before you even think about hitting that record button, just run through your script a few times. The goal isn't to memorize it word-for-word, but to get comfortable enough with the material that you can speak naturally.
Try to keep your energy level consistent. If you have to record over multiple sessions, it's a good idea to watch a quick clip from your last take to match your tone and enthusiasm. And remember to speak clearly and deliberately. Don't rush. Use pauses to let your key points really sink in. Think of it less as a presentation and more as a conversation with your learner.
Here’s a simple, repeatable setup I follow before every single recording session to make sure things go off without a hitch.
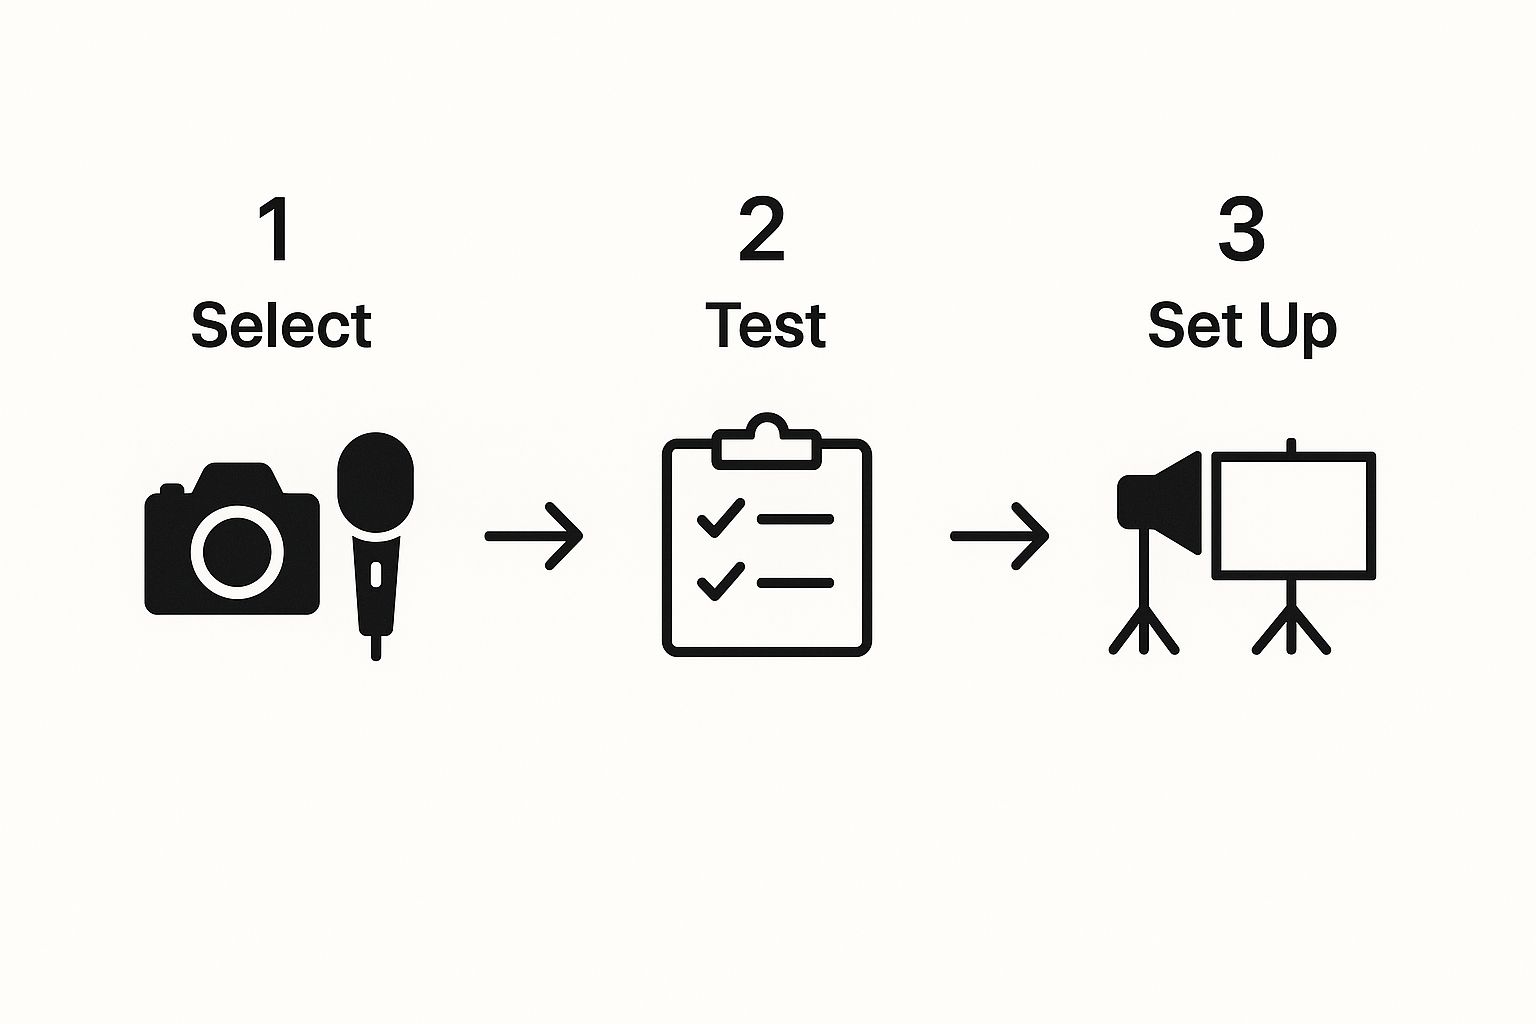
Running through this sequence—select, test, and set up—builds a reliable foundation for every video. It's the best way to minimize technical headaches and ensure you’re starting with high-quality raw footage.
The Power of Screen Recordings
For software demos or walking someone through a process, screen recordings are indispensable. Modern tools like Screendesk make this incredibly straightforward. You can capture your screen, voice, and even your webcam feed all at once, which adds a welcome personal touch to an otherwise technical walkthrough.
If you’re just getting started, we have a detailed guide on how to best record your screen and camera video for maximum impact.
Here are a few pro tips for great screen recordings:
- Clean Up Your Desktop: Seriously, close those extra tabs and turn off notifications. A cluttered screen is a distracted viewer.
- Boost Your Cursor Size: Make your mouse cursor a bit larger or use a highlighting tool. It helps people follow your actions without getting lost.
- Zoom In on Details: When you’re pointing out a specific button or menu option, zoom in on that area. It instantly draws the viewer’s focus right where you want it.
Assembling the Pieces in Post-Production
Once all your raw footage is in the can, it’s time for post-production. This is where you’ll trim out mistakes, arrange clips logically, and add that final layer of polish. Your first pass should be all about structure—just piece together the best takes to create a coherent story that follows your script.
Don't be afraid to be ruthless with your cuts. Get rid of the "ums" and "uhs," and tighten up any pauses that go on for too long. A video with a brisk pace holds attention much better than one that drags.
Your goal in editing is to be invisible. The final video should flow so smoothly that the viewer never thinks about the cuts, transitions, or effects. They should only be focused on the content they're learning.
With the main narrative in place, you can start adding layers that really enhance the learning experience. This is how you take a good video and make it great.
- B-Roll Footage: Cut away to different shots to illustrate a point or just to break up a long segment of someone talking. This could be a close-up of a product, a shot of a colleague performing the task, or even some relevant stock footage.
- Text Overlays and Graphics: Use on-screen text to reinforce key terms, pop up important numbers, or list out steps. In a software demo, simple animations can be a great way to highlight critical areas of the screen.
- Subtle Music: A quiet, instrumental track in the background can really set the tone and fill any audio gaps. Just make sure it’s not distracting—the volume should be low enough to be felt, not actively heard.
These core principles of filming and editing are universal. They apply whether you're creating a formal training module or just creating engaging video content like Instagram Reels, which follows many of the same production steps.
Editing Software Options for Training Videos
Choosing the right software can feel overwhelming, but it really depends on your needs and budget. Here’s a quick breakdown of some popular options to help you decide.
| Software | Best For | Key Features | Price Range |
|---|---|---|---|
| Screendesk | Quick screen recordings & simple edits | Screen capture, basic trimming, webcam overlay | Free & Paid tiers |
| iMovie | Beginners on Apple devices | User-friendly interface, templates, basic effects | Free (with Apple devices) |
| Camtasia | Professional software tutorials & training | Screen recording, cursor effects, quizzes, annotations | $299 (one-time) |
| Adobe Premiere Pro | Advanced, professional-grade projects | Multi-cam editing, advanced color grading, motion graphics | $22.99/month |
| DaVinci Resolve | Color grading & high-end post-production | Industry-leading color correction, fusion effects, Fairlight audio | Free & Paid Studio versions |
Ultimately, the "best" tool is the one that fits your workflow and helps you create clean, effective videos without a steep learning curve getting in your way.
The shift toward video is undeniable. By 2025, it’s projected that video will make up 82% of all global internet traffic. We even see it on professional platforms like LinkedIn, where video posts are shared 20 times more than other content types. Mastering video production is no longer just a nice-to-have skill—it's becoming a core competency for effective communication.
You’ve created an amazing training video. Now what?
Getting it in front of the right people—and making sure it actually works—is where the real work begins. The most brilliant video is worthless if it's sitting on a hard drive, never seen, or if viewers tune out after 30 seconds. This last leg of the journey is all about smart distribution and digging into the data to prove your video's worth.
How you get your video out there really comes down to balancing easy access with necessary security. Where you decide to host it dictates who sees it and what they can do with it.
Choosing the Right Distribution Platform
Your choice of platform should match your company's security policies and, just as importantly, fit into your audience's daily workflow. You've got a few solid options, each with its own quirks.
- Internal Learning Management System (LMS): This is usually the go-to for any formal corporate training. An LMS gives you a secure, central spot to track who has completed what, run quizzes, and manage certifications. It’s perfect for things like compliance training or new hire onboarding.
- Private Video Hosting (Vimeo/Wistia): If you need to share sensitive info with partners or clients but don't want it public, platforms like Vimeo are fantastic. They offer strong privacy controls, letting you password-protect videos or lock them down so they can only be embedded on specific websites.
- Unlisted YouTube Channel: For less formal stuff, an unlisted YouTube link is incredibly fast and easy. It's not Fort Knox—anyone with the link can watch—but it’s a great, no-cost option for quick how-to guides or informal team updates.
The demand for great digital training is exploding. The global market for training video production is expected to climb to around USD 1,165 million by 2033, largely because of the shift to remote work and the need for training that can scale. This just goes to show how critical it is to not just make good videos, but to get them to your team and measure their impact effectively.
Measuring What Truly Matters
Once your video is out in the wild, your job title changes from creator to analyst. Forget about vanity metrics like total view counts. You need to look at the numbers that tell you how people are really interacting with your content. This is where you'll find your roadmap for making the next video even better.
A key metric to obsess over is the average watch time. This tells you, point-blank, how long people are sticking around. If you have a critical 10-minute video but the average watch time is only two minutes, you have a problem.
Here are the key metrics I always keep an eye on:
| Metric | What It Tells You | Why It's Important |
|---|---|---|
| Completion Rate | The percentage of people who made it to the very end. | This is your gold standard for mandatory training. If the rate is low, your video might be too long, too boring, or just not hitting the mark. |
| Viewer Drop-Off Points | The exact spots in the timeline where viewers are clicking away. | This is a treasure map for finding confusing parts, jargon-heavy sections, or slow segments that need a re-edit. |
| Re-Watches | Sections that viewers rewind and watch over and over. | This highlights complex topics that are important but might need a simpler explanation or even their own short, dedicated video. |
| Click-Through Rate (CTR) | The percentage of viewers who clicked on a link or call-to-action. | This shows you if your video is successfully pushing learners to the next step, whether that's a quiz or a resource page. |
The most valuable insights come from mixing the 'what' (the data) with the 'why' (the people). Numbers tell a story, but a quick survey with your audience can give you the plot twist you never saw coming.
Gathering Direct Feedback for Continuous Improvement
Data tells you what people are doing, but only your learners can tell you why. You need to pair your analytics with real human feedback to get the full story.
After someone finishes a training video, send them a super-short survey. Ask a few simple, open-ended questions.
- What was the most helpful part of this video?
- Was there anything that left you confused?
- If you could change one thing about this training, what would it be?
This kind of direct feedback is priceless. It can uncover issues that the numbers alone would never show you. For instance, a video might have a great completion rate, but feedback could reveal that everyone is still fuzzy on a key process. These insights are also crucial when you're thinking about other applications, like video customer support, where crystal-clear communication is everything.
By constantly measuring, asking for feedback, and tweaking your approach, you turn your training videos from a one-and-done project into a living, breathing resource that gets better over time.
Your Top Questions About Making Training Videos, Answered
If you're diving into creating training videos, you've probably got a few questions. It’s totally normal. Everyone from first-timers to seasoned pros runs into the same handful of challenges. Let's walk through some of the most common ones I hear all the time.
Getting these basics sorted out from the start will save you a ton of headaches later and help you build your training on a much stronger foundation.
"How Long Should My Training Videos Be?"
This is the big one, and the honest answer is: it depends entirely on the topic. But if you’re looking for a solid starting point, aim for 5-7 minutes for any single, focused idea. That seems to be the sweet spot.
Got a bigger, more complex subject? Don't even think about making a 30-minute marathon video. Your best bet is to break it down into a series of shorter, bite-sized videos that build on each other. This microlearning strategy is a game-changer for keeping people engaged and actually remembering what they learned. It’s just easier for them to squeeze in a quick lesson.
"What's the #1 Thing That Makes a Video Look Professional?"
You might think it's the camera, but it's not. The single most crucial element for a professional feel is crystal-clear audio. Seriously, this is one area you can't compromise on.
People will forgive video that's a little grainy or not perfectly lit. But if the audio is muffled, full of echoes, or has a loud hum in the background, they're gone. Bad audio just screams "amateur" and makes the content a chore to get through.
If you're going to spend money on one piece of gear, make it a decent external microphone. It will give you more bang for your buck than any fancy camera or lighting setup.
"Do I Have to Be a Perfect, Polished Speaker on Camera?"
Nope, not at all. In fact, trying too hard to be a "professional actor" can come across as stiff and unnatural. Authenticity is way more important than a perfect delivery. People want to learn from a real person, a genuine expert—not watch a scripted performance.
The goal is to be comfortable and speak from a place of knowledge. Let your passion for the subject come through. It's a good idea to practice what you're going to say so you're not tripping over your words, but don't try to memorize a script word-for-word. It’s your expertise that will make the connection.
Here are a few tricks that have helped me feel more natural on camera:
- Talk to one person. I literally picture a friendly coworker I'm explaining something to, right on the other side of the lens.
- Use your hands. Don't just stand there like a statue. Gesture like you would in a normal conversation. It helps loosen you up.
- Smile. It sounds simple, but it makes you look instantly more engaging and approachable.
When you focus on just communicating clearly and being yourself, you create content that's not just informative but also trustworthy. That's how you really make an impact and help people learn.
Ready to create stunning training videos without all the technical frustration? Screendesk gives you everything you need to record, edit, and share high-quality tutorials and screen recordings with zero hassle. Start creating better training content today!