
Ever wrapped up a fantastic meeting and instantly wished you could hit rewind on a key moment? Learning how to record a video call isn't just about having a backup; it's a game-changer that can redefine how your team works, learns, and shares ideas. It’s about turning those fleeting, valuable conversations into permanent, reusable assets.
Why You Should Record Your Video Calls

Recording your video calls unlocks some serious potential that goes way beyond simple note-taking. You're creating lasting value from conversations that would otherwise just vanish into thin air.
Think about it. You could turn a single expert training session into a go-to onboarding resource for every new hire who walks through the door. No more repeating the same information over and over. Instead, you give every new team member a consistent, high-quality experience, saving a ton of time while making sure everyone gets the same core knowledge.
Capture Critical Details and Feedback
Let's say you're in a product demo. By recording the call, you capture every bit of client feedback as it happens. Every question, every pause, every "what if" is saved with perfect clarity. This gives your development team raw, unfiltered insights to guide their next steps. It's incredibly powerful stuff.
Recordings are also a lifeline for remote teams scattered across different time zones. Anyone who couldn't make the live meeting can catch up completely, making sure they don't miss out on important decisions or context. This kind of flexible, asynchronous communication is what makes remote work work.
The sheer volume of video conferencing highlights just how vital this is. Platforms like Zoom host over 3.3 trillion annual meeting minutes, and a massive chunk of those are for work. The ability to record these interactions is what turns them from one-off chats into a searchable library of knowledge.
Key Takeaway: The real win here isn't just about archiving calls. It's about building an on-demand library of institutional knowledge that improves everything from training and product development to keeping your whole team on the same page.
Beyond Internal Use
Your recorded calls can become powerful marketing tools, too. A great customer success story caught on video can be repurposed for a case study, or a lively Q&A session can be turned into a valuable piece of content for your audience. If you're planning to use recorded calls for broader outreach, check out some proven webinar marketing strategies to get the most mileage out of them.
Of course, this all comes with a big responsibility: consent. You absolutely must inform participants that the call is being recorded. This transparency is non-negotiable. It’s how you build trust, maintain good relationships, and stay on the right side of privacy laws.
Choosing the Right Recording Tool for Your Needs
Picking the right way to record your video call isn't as daunting as it might seem. Honestly, it just boils down to one simple question: What are you going to do with the recording? Your answer will point you straight to the right tool and have a huge impact on the final video's quality and how easy it is to work with.
For those quick internal syncs or daily huddles where you just need to capture action items, the built-in recorder on platforms like Zoom or Google Meet is your best bet. It's incredibly convenient—you hit a button, and the platform does all the heavy lifting. No extra software, no fuss.
When to Bring in the Heavy Hitters
But what if you're creating something more polished? Let's say you're recording a detailed product demo for a new client or hosting a webinar that's going to become a key marketing asset. A basic, one-click recording just isn't going to cut it. You're going to want more control.
This is exactly when dedicated screen recording software like OBS Studio or Camtasia becomes your best friend. These tools give you far more power over the final product. We're talking higher resolution video, the ability to capture multiple audio sources separately (a lifesaver in editing!), and a ton of other professional-level features.
This handy visual can help you decide based on what's most important to you, like cost or specific features.
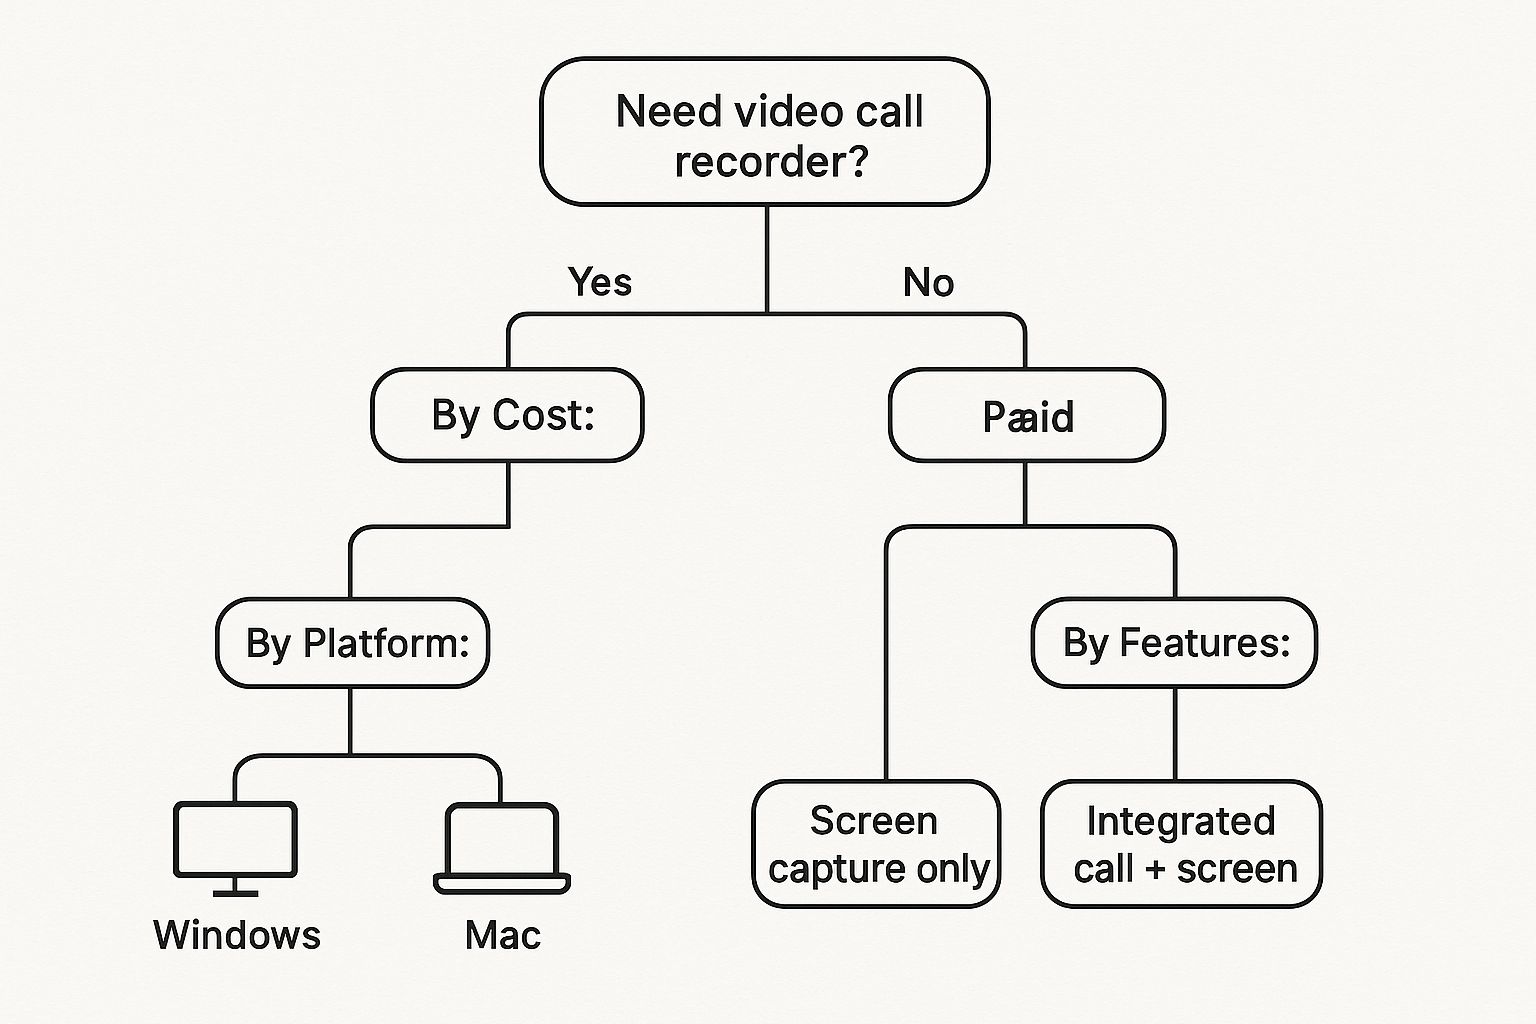
As you can see, thinking about your budget first often helps narrow down the options and leads you toward the tool with the right capabilities for the job.
To make the choice even clearer, let's break down the common trade-offs between the two main approaches.
Comparison of Video Call Recording Methods
| Feature | Built-in Recorders (e.g., Zoom, Teams) | Third-Party Software (e.g., OBS, Camtasia) |
|---|---|---|
| Convenience | Extremely high. Just click "Record" within the call. | Moderate. Requires separate installation and setup. |
| Video/Audio Quality | Good enough for most internal uses, but often compressed. | Excellent. Full control over resolution, frame rate, and bitrate. |
| Audio Control | Limited. Usually mixes all audio into a single track. | Advanced. Can record microphone, system audio, and guest audio on separate tracks. |
| Editing Features | None to very basic. You get a single video file. | Powerful. Many tools include a full-featured video editor. |
| Cost | Often included with your subscription or free. | Can be free (OBS) or require a one-time purchase/subscription (Camtasia). |
| Customization | Low. Little to no control over layout, branding, or overlays. | High. Add custom layouts, watermarks, camera overlays, and more. |
Ultimately, the table shows there's no single "best" option—it's all about what you need to accomplish.
Matching the Tool to the Task
The real secret is to avoid making things harder than they need to be. Firing up a complex tool like OBS for a simple team check-in is just overkill. On the flip side, relying on a basic Zoom recording for a high-stakes presentation might leave you with a video that doesn't look as professional as you'd like.
Think about it in these real-world terms:
- Daily Stand-up: A quick, informal chat to keep everyone aligned.
- Best Tool: The built-in recorder in Zoom or Teams. Fast and simple.
- Client Onboarding Session: You need a clean recording to share with the client's team.
- Best Tool: Third-party software gives you better audio and lets you add your company's branding.
- Polished YouTube Tutorial: This is public-facing content that needs to look sharp and be easy to follow.
- Best Tool: An advanced third-party application with a full editing suite is a must.
By matching your tool to the task at hand, you'll work more efficiently and get a better result every single time. If you want to dive deeper, our comprehensive guide on how to record a video call walks through the specific steps for different platforms, making sure you're ready for any recording scenario.
Recording Directly Within Zoom and Google Meet
Sometimes, the simplest solution is the best one. If you just need a straightforward recording of your meeting without any fancy editing later, using the tool you're already on is the way to go. Platforms like Zoom and Google Meet have built-in recorders that get the job done with a couple of clicks. No extra software, no complicated setup.
The process itself is easy, but a few details can trip you up if you’re not prepared. You need to know who can hit "record" and where the final video file lands. Figuring this out beforehand will save you from that awkward scramble mid-call.
How to Start a Recording in Zoom
I've found Zoom's recording feature to be incredibly user-friendly, but your ability to use it often depends on your account type and whether you're the host. If you're running the meeting, you have all the power.
When you're ready to go, just glance at the control bar at the bottom of your screen. You'll spot a "Record" button. Clicking it usually gives you two choices, depending on your plan:
- Record on this Computer: This does exactly what it says—it saves the video file right onto your computer's hard drive. It's my go-to for when I need the file immediately for some quick offline editing.
- Record to the Cloud: This option is a lifesaver for paid accounts. It saves the recording to your Zoom cloud storage, which means you can share it with a simple link. No massive file transfers needed.
The moment you start recording, Zoom makes sure everyone is aware. A "Recording" indicator pops up, and a voice prompt clearly announces, "This meeting is being recorded." This is a non-negotiable step for transparency and getting consent.
You can see just how clear that "Record" button is in the meeting interface. It’s designed to be obvious so you're not fumbling through menus.
Recording Your Call in Google Meet
Google Meet also offers a seamless recording experience, though its approach to saving files is a bit different. Keep in mind that the ability to record is usually reserved for specific Google Workspace accounts, so it might not be available if you're on a free personal account.
To kick things off in Google Meet, find the three-dot menu (More options) in the bottom-right corner. A menu will appear, and right at the top, you'll see "Record meeting." Just like Zoom, Meet will prompt everyone for consent before the recording officially starts.
Key Difference: Here's where Google Meet stands apart. It only saves to the cloud. All recordings are automatically sent to a special "Meet Recordings" folder in the host's Google Drive. This is fantastic for sharing within a company, but it also means you'll need to be online to access and download your video.
Important Considerations for Built-in Recorders
While convenient, the built-in recorders on Zoom and Google Meet aren't perfect for every situation. They typically produce a single video file with everyone's audio tracks merged. This is fine for archiving, but it can be a real headache if you plan to edit the audio later.
These built-in tools are great for basic needs, but it's worth knowing what else is out there. Taking the time to explore the best video conferencing software can help you find a platform that truly fits your goals, whether that's simple meeting documentation or creating high-quality content. It’s all about using the right tool for the job.
Getting More Control With Third-Party Recording Software
Sometimes, the built-in recorder on your video call app just doesn't cut it. When you need to move beyond a basic, one-click recording and start creating truly professional video content, it’s time to call in the specialists.
Think about it. If you're recording a client testimonial or putting together a detailed training module, you need more than a simple file dump. You need fine-tuned control over the video quality, the audio sources, and the overall look and feel. This is exactly where dedicated recording tools shine.
Why Granular Control is a Game-Changer
A built-in recorder is like a point-and-shoot camera—it’s simple and gets the job done. Third-party software, however, is your DSLR. It gives you manual control over every little setting, letting you capture exactly what you have in mind.
This level of control is especially critical for post-production. Take a powerful free tool like OBS Studio, for example. It allows you to capture different sources completely independently. You can record the video call window, your own webcam, and your microphone all as separate inputs.
So, why is that a big deal? It means your microphone’s audio is recorded on a completely different track from your guest’s audio. In editing, you can clean up, adjust the volume, or even cut out one person's audio without touching the other. Honestly, this one feature is probably the single biggest leap you can take toward producing professional-sounding videos.
Premium Tools for a Smoother Workflow
If you're looking for an all-in-one package, premium options like Camtasia wrap screen recording and video editing into one seamless workflow. You can record your call and then immediately dive into its user-friendly editor to trim clips, add text on screen, or drop in some background music.
This integrated approach is a huge time-saver and simplifies the entire creation process. Here’s a quick look at what this lets you do:
- Set up multiple sources: Easily configure your screen, webcam, and microphone as separate, manageable inputs.
- Record in high resolution: Capture your video in crisp 1080p or even 4K, making sure it looks sharp no matter where it's viewed.
- Add professional touches: Effortlessly add your company logo as a watermark or insert lower-thirds to introduce speakers.
This is how you transform a standard meeting recording into a polished, shareable piece of content that actually represents your brand well. You’re no longer just documenting a call; you’re strategically creating a valuable asset.
And the value here is real. High-quality recorded video has become a key part of how modern businesses communicate. By 2025, 89% of businesses were already using video as a marketing tool, with a whopping 95% of video marketers calling it essential to their campaigns. A lot of these videos, like the explainer content made by 73% of marketers, often start as recorded calls that get polished for a bigger audience. You can see more on video's impact in Wyzowl's latest findings.
A Quick Peek at the Setup
Getting started with a tool like OBS might look a bit intimidating at first, but the basic idea is pretty straightforward. You create a "scene," which is like your canvas, and then you add "sources" to it. Your video call window is one source, your webcam is another, and your microphone is a third.
From there, you can arrange these sources however you want. For instance, you could have the video call fill the screen while your webcam feed sits in a small circle in the corner. This ability to create custom layouts is something you just can't do with a basic built-in recorder. It’s this very customization that makes third-party software the go-to choice for anyone creating tutorials, webinars, or any video where a professional presentation really matters.
7 Simple Steps for a High-Quality Recording

Hitting the record button is easy. The real magic, though, happens before the call even starts. I've found that a few simple, intentional adjustments can be the difference between a recording that looks amateurish and one that comes across as impressively professional.
These aren't complicated technical fixes but practical steps anyone can take. It all begins with your environment. Good lighting, for example, makes a world of difference, and you don’t need an expensive rig. Just sitting so you're facing a window provides soft, natural light that works wonders. Likewise, a clean, uncluttered background keeps the focus where it should be: on you.
Optimize Your Audio and Video Setup
While we all want to look good on camera, I can tell you from experience that bad audio is what truly tanks a recording. Your laptop's built-in microphone is almost always the weakest link.
Honestly, the single best investment you can make is an external USB microphone. This one change alone will make your voice sound crisp and full, getting rid of that tinny, distant sound that plagues so many recordings.
To take your audio to the next level, you should also:
- Kill background noise: Close any open doors and windows. Don't forget to silence your phone notifications!
- Dampen echo: Recording in a room with soft surfaces—like carpets, curtains, or even a full bookshelf—is a great trick. These materials absorb sound waves instead of letting them bounce around.
- Wear headphones: This is a non-negotiable. It stops your microphone from picking up the audio from your speakers, which is the primary cause of that distracting echo effect for everyone else on the call.
A high-quality recording is a cornerstone of effective communication. Taking a few minutes to prepare shows you respect your audience's time and ensures your message is delivered with the clarity it deserves.
Prepare Your Computer for a Smooth Recording
Your computer is already working hard just to run a video call; adding recording to the mix puts even more strain on it. To get a smooth, lag-free result, you need to give it as many resources as possible. Before you hit record, close every other application and any browser tabs you don't absolutely need.
This simple act frees up a ton of processing power and memory, which directly reduces the risk of your video freezing or your audio getting choppy. A stable internet connection is also key. If you're curious about the more technical side, you can read about the impact of broadband bonding on video conferencing and other video applications.
With the video conferencing market projected to hit $10.0 billion by 2025, it's clear these calls are a central part of how we work. As more businesses rely on them, the need for high-quality recordings is growing right alongside.
These preparations are crucial for turning a simple call into a valuable, reusable asset. For a more detailed walkthrough, you can check out our complete guide: https://blog.screendesk.io/video-call-recording/
Answering Your Top Questions About Recording Video Calls
When you first start thinking about recording video calls, a few key questions always pop up. Let's tackle them head-on. Getting these right from the start will help you avoid any legal headaches or technical hiccups, so you can feel confident every time you hit that record button.
The biggest hurdle for most people is the legal side of things. Are you even allowed to do this? The answer really boils down to where you and everyone else on the call are located.
Is It Legal to Record a Video Call?
This is, without a doubt, the most important question. The legality all comes down to consent laws, which are different all over the world. Some places have what's called "one-party consent," meaning as long as you're part of the conversation, you can record it without telling anyone else.
However, many other regions require "two-party" or "all-party" consent. This means absolutely everyone on the call needs to know and agree that they're being recorded.
My advice? To play it safe and maintain trust, always act as if all-party consent is the rule. Make it a habit to announce you’re recording at the very beginning of the meeting. Most tools like Zoom give an automated heads-up, but a quick verbal confirmation goes a long way.
Can I Record a Call If I'm Not the Host?
Usually, no. Platforms like Zoom and Google Meet are designed to give recording controls only to the host or co-hosts. This isn’t an accident; it’s a built-in privacy and security measure.
If you need a recording of a meeting you aren’t running, your best bet is to simply ask the host. They can either make you a co-host or start the recording for you and share the file later. You could use third-party software as a workaround, but you still absolutely need to get clear consent from everyone first. We dive into more options in our complete guide on how to record a video call.
How Can I Improve Poor Audio Quality in My Recording?
Nothing tanks a recording faster than bad audio. If your sound is fuzzy, distant, or full of echo, the culprit is almost always your computer's built-in microphone.
The single best thing you can do is invest in an external USB microphone. The difference in clarity is night and day. Beyond that, here are a few simple tricks I've learned over the years that make a huge impact:
- Pick a quiet space. Rooms with soft surfaces—think carpets, curtains, or even a few pillows—are great for soaking up echo.
- Use headphones. This is a non-negotiable. It stops your mic from picking up the sound coming out of your speakers, which is what causes that awful feedback screech.
- Politely ask others to mute. Encourage everyone to hit mute when they're not talking. It’s amazing how much background noise this eliminates.
At Screendesk, we're obsessed with making it easy for customer support teams to record and share high-quality video. Our tool plugs right into your helpdesk, turning video calls and screen sharing into a simple, effective way to solve problems faster. Learn how Screendesk can improve your customer interactions.