
So, you need to record a video call. Getting a good recording is about more than just hitting a button; it’s about having the right tools and a solid plan. You could use the built-in recorder on platforms like Zoom or Microsoft Teams, but a dedicated app like Screendesk often gives you far better quality and more control.
It really comes down to preparing your setup and knowing why you’re recording in the first place.
Why Recording Your Video Calls Is a Game Changer
Before we get into the "how," let's quickly touch on the "why." Recording calls isn't just for keeping minutes anymore. It has become a core strategy for smart, modern teams. When you build a library of recorded calls, you unlock some serious benefits for training, collaboration, and day-to-day productivity.
Think about it. That standard team huddle? It could be a fantastic training video for the next person you hire. And what about that client feedback call? Capturing it perfectly means you won't ever misremember a key detail that could throw a project off track. This isn't just about convenience—it's about building smarter, more reliable workflows.
Boost Team Productivity and Knowledge Sharing
In a world of remote and hybrid work, getting everyone on the same page is a constant struggle. Recordings are the simple answer, creating a single source of truth that anyone can tap into whenever they need it.
- Onboard New Employees Faster: Instead of scheduling the same kickoff meetings over and over, just give new hires access to past training sessions and project deep dives. They'll get up to speed in a fraction of the time.
- Accommodate Different Time Zones: When your team is scattered across the globe, live meetings are always tough. With a recording, no one has to miss out on important context or decisions just because of their schedule.
- Preserve Key Decisions: Stop relying on messy notes or foggy memories. A video is the ultimate record of what was discussed and agreed upon, heading off potential disagreements down the road.
Having a clear, accessible record of discussions is no longer a luxury but a necessity. It ensures that every team member, regardless of their location or schedule, has access to the same information, fostering a more inclusive and efficient work environment.
This isn't a niche habit; it's a massive shift in how we work. The global video conferencing market, already valued at $28.61 billion, is expected to skyrocket to $60.17 billion by 2025. With platforms like Microsoft Teams boasting over 270 million daily active users, the need for solid recording tools is more obvious than ever. If you're curious, you can explore more about video conferencing trends and see just how much they're changing business communication.
Your Pre-Flight Checklist For A Perfect Recording
A high-quality recording is made long before you ever hit the "record" button. Think of it like a pilot's pre-flight checklist. Taking just a few minutes to get your setup right can be the difference between a polished, professional video and a cringeworthy one you can't even use.
It all starts with your environment. Find a quiet space where the dog isn't going to bark and you won't get interrupted. Trust me, background noise is one of the fastest ways to ruin an otherwise great take. Also, take a quick look at what's behind you. A messy room or a busy hallway is just distracting. A simple, clean background keeps the focus right where it should be: on the conversation.
Master Your Audio And Video
Let's be blunt: crystal-clear audio is non-negotiable. Your laptop's built-in microphone might be easy, but it’s notorious for picking up every keyboard tap and the whir of your computer's fan. An external USB microphone is probably the single best investment you can make for upping your quality.
For the best results, try to position it about six inches from your mouth.
Next up is lighting. The biggest rookie mistake is sitting with a bright window behind you, which instantly turns you into a shadowy silhouette. The easy fix? Face the window to get that soft, natural light. If that's not an option, a simple lamp or a ring light placed in front of you and slightly to one side works wonders.
The goal is to light your face evenly without creating harsh shadows. Good lighting makes you look more engaged and professional, instantly boosting your video's quality. It shows you put thought into the call, and people notice.
Finally, let's talk framing. Your camera should be at eye level—don't be afraid to stack some books under your laptop to get it there. You want to position yourself so your head and upper shoulders are in the shot, with just a little bit of breathing room above your head. This classic composition just looks balanced and natural.
Run A Technical And Ethical Check
Before anyone joins the call, do a quick tech rehearsal. Test your internet connection to make sure it’s stable enough for video. If you plan to record a video call with a tool like Screendesk, open it up ahead of time and make sure it sees your microphone and camera. A last-minute scramble is never a good look.
To make this even easier, I've put together a little checklist to run through before you go live.
Quick-Check for Recording Readiness
| Check Area | What to Do | Why It Matters |
|---|---|---|
| Audio | Test your external mic in the recording app. | Prevents that dreaded muffled or echoey sound. |
| Lighting | Face a light source; avoid backlighting. | Ensures your video is clear and professional. |
| Background | Pick a simple, non-distracting space. | Keeps the focus on you and the conversation. |
| Internet | Run a quick speed test for stability. | Helps you avoid lag, pixelation, or dropped calls. |
Running through these quick checks takes maybe two minutes but saves a world of headaches later.
And here’s the most important step: get consent. Always let people know at the very start of the meeting that you'll be recording. It's not just a professional courtesy; in many places, it's a legal requirement. Being transparent builds trust and makes sure everyone is comfortable. For a deeper dive into the mechanics of capturing your screen, you can read our complete guide on how to screen record video. Getting this part right sets the perfect tone for the rest of the session.
Recording Your Call on Zoom, Google Meet, and Teams
Alright, let's get into the nitty-gritty. You're in a call and need to hit record—what do you do? The process is slightly different depending on whether you're using Zoom, Google Meet, or Microsoft Teams, but once you know the steps for your platform of choice, it's a piece of cake.
Getting a high-quality recording isn't just about software, though. Your physical setup—camera, mic, and lighting—plays a huge role in how professional the final video looks and sounds.
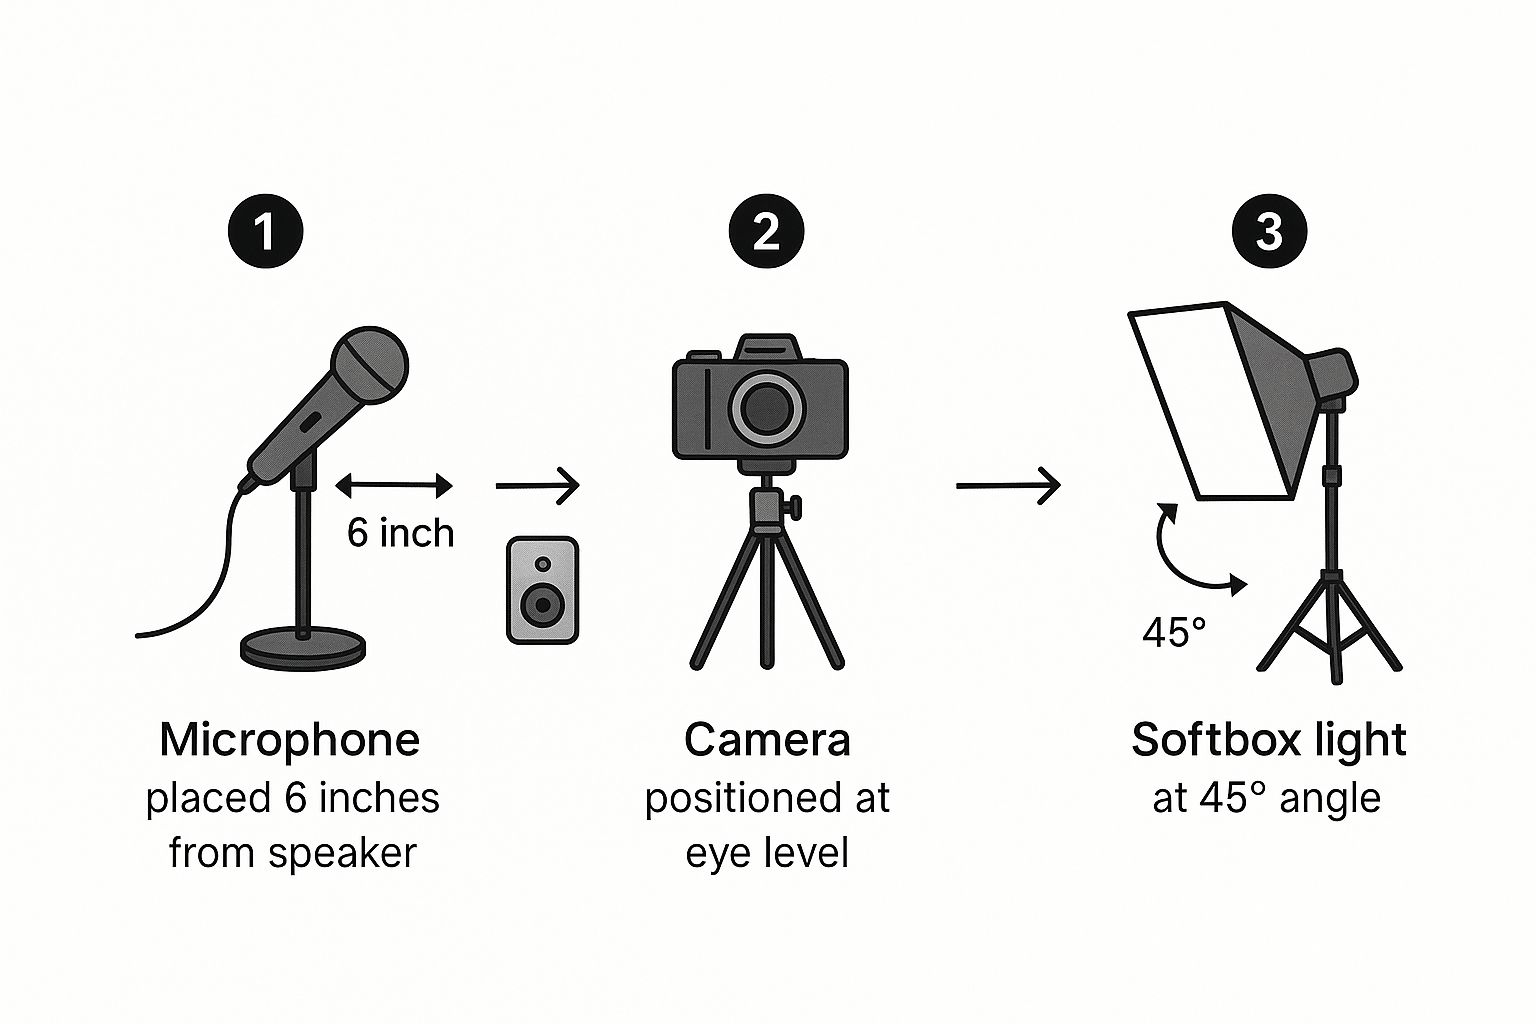
As you can see, a little thought into equipment placement goes a long way. It's the foundation for a great recording.
Recording Your Call In Zoom
Zoom is probably the most straightforward of the bunch. Its recording feature is front and center. Once your meeting is live, just look at the bottom toolbar. You'll see the Record button, usually sitting right between "Share Screen" and "Reactions."
If you have a paid Zoom plan, clicking it will likely give you two choices:
- Record on this Computer: This is the go-to for a quick, local save. The video file goes directly onto your hard drive. Just be mindful that these files can get pretty big.
- Record to the Cloud: A fantastic option for easy sharing. The recording is saved to your Zoom account online, and you can share it with anyone using a simple link.
For a really deep dive into Zoom's features and how to tweak every setting, the official dedicated Zoom tool page is an excellent resource.
Once you hit record, a small "Recording" indicator pops up in the top-left corner. This is great because it makes it obvious to everyone on the call that they're being recorded. When you're ready to stop, just click the Stop Recording button in that same toolbar. Zoom will then process the video after the meeting ends and put it in your chosen spot.
Capturing Meetings In Google Meet
Recording in Google Meet is just as clean, but the feature is typically limited to certain Google Workspace subscriptions. Assuming you have access, the process is incredibly smooth.
First, join your call. Then, look for the three-dot menu icon in the bottom-right corner. Give that a click, and from the menu that pops out, select Start recording. Google Meet will ask you to confirm that everyone is ready. Click Start, and you're rolling.
A neat thing about Google Meet is how it handles storage. All recordings automatically land in a special "Meet Recordings" folder inside the meeting organizer's Google Drive. This keeps everything organized and easily accessible for your team without any extra work.
To ensure transparency, everyone on the call gets an audible alert and sees a red "REC" icon appear. When you're finished, just head back to that same three-dot menu and choose Stop recording. Google will process the file and email a link to the organizer as soon as it's ready.
How To Record In Microsoft Teams
As a hub for all things work-related, Microsoft Teams obviously has a solid recording function built-in. Like Google Meet, this is usually a perk for paid Microsoft 365 business or enterprise plans.
To kick things off, go to the meeting controls at the top of your screen and click the More actions button (the three dots). In the dropdown menu, you'll find the Start recording option.
Teams is excellent about keeping everyone informed. The moment you start, a banner appears at the top of the meeting, telling everyone that recording is in progress. This notification also gets logged in the meeting's chat history.
The recording will capture everything—audio, video, and any screen sharing. To wrap up, go back to the More actions menu and click Stop recording. The video then gets processed and saved to either Microsoft Stream or SharePoint, based on how your company has it set up. A link to the finished recording will be posted directly in the meeting chat for everyone to access.
These steps cover the basics for each platform, but if you're looking to build a more advanced recording workflow, our guide on how to record a video call has more tips and strategies.
Going Pro: Advanced Recording with Third-Party Tools
While the built-in recorders on platforms like Zoom, Google Meet, and Microsoft Teams are handy for quick captures, they definitely have their limitations. When you need more firepower—higher quality, better control, or the ability to record a video call when you aren't the host—it’s time to bring in a dedicated tool like Screendesk.
Think of it like this: your meeting platform's recorder is the point-and-shoot camera on your phone. It’s simple and gets the job done. A dedicated recording tool, on the other hand, is like a professional DSLR. It gives you complete creative control over the final product, from resolution to editing. For anyone who sees their recordings as valuable assets, it's a must-have.
Why You Might Need More Than the Basics
The biggest reason to look beyond native features? Freedom. With a third-party recorder, you’re not at the mercy of the host's permissions.
Ever been in a webinar and wished you could save it for later, or on a client call where you desperately needed a copy for your own records? A dedicated tool lets you hit record without waiting for someone to grant you access. This is a total game-changer for participants who need their own reliable copy.
Plus, the quality is often in a different league. You can typically crank the resolution up to 4K and cherry-pick your audio sources. This ensures your final video looks sharp and the audio is crystal clear—absolutely essential if you're planning to repurpose that content later.
A dedicated tool puts you in the director's chair. You control the frame, the quality, and the audio, turning a standard meeting into a high-fidelity asset you can use for training, content, or just bulletproof record-keeping.
This level of precision is invaluable in so many scenarios. A content creator recording a podcast interview, for instance, can get separate audio and video tracks for each person, which makes the editing process a thousand times easier. Or imagine a support manager recording a troubleshooting session; they can capture the conversation and the on-screen steps in perfect clarity to train new team members.
How a Third-Party Recording Setup Works
Getting set up with a tool like Screendesk is surprisingly simple. The main idea is that you're just capturing a specific part of your screen—the window where your video call is taking place.
Here’s what that workflow usually looks like in practice:
- Fire up the recorder first. Open the app before you even join the call. It’s good practice to have it ready to go.
- Pick your recording area. You'll get options to record your full screen, a single application window, or a custom area. For the cleanest result, I always recommend selecting the specific meeting window.
- Set your audio sources. This step is crucial. You need to tell the software what sound to grab. You’ll want to capture System Audio (what everyone else is saying) and your External Microphone (what you're saying).
- Hit record and relax. Once the call starts, just click the record button in your tool. When it's over, stop the recording in the same app.
The best part? The video file saves instantly to your computer, completely separate from the meeting platform's cloud. No waiting for processing. You get a pristine recording that's ready to edit, share, or archive right away. It's the most reliable way to make sure you always get the shot.
What to Do After Your Video Call Is Recorded
So, you’ve hit the stop button. Great. But your work isn't quite done. A raw video file is just the starting point; what you do next is what turns it from digital clutter into a truly valuable asset.
Getting your post-recording workflow right is how you transform that simple video into a reusable resource. This means organizing your files, sharing them smartly, and making a few key edits to get them looking professional. These habits are essential if you're building a library of call recordings for training, documentation, or just keeping your team on the same page.
Organize and Name Your Recordings
Let's be honest, a folder full of randomly named videos is a productivity nightmare. You need a system. The second a recording finishes saving, give it a name that actually means something. "Zoom_Meeting_01" is useless when you're trying to find it a month from now.
A consistent naming convention will save you countless headaches. I've found a simple format works best:
- [Date][Project/Client][Topic/Purpose]
- For example:
2024-10-28_ProjectPhoenix_KickoffMeeting - Or:
2024-11-05_AcmeCorp_Q4Review
This little habit makes searching for specific calls incredibly fast. I recommend storing these in organized cloud folders on a platform like Google Drive or SharePoint so your whole team can find what they need without having to ping you. This is the bedrock of managing the output when you record a video call.
The value of a recording plummets if no one can find it. A clear, consistent naming and storage strategy is the foundation of any good video library. It ensures your team’s knowledge stays accessible long after the call has ended.
Secure Sharing and Simple Edits
Once your file is named and sorted, it’s time to get it to the right people. Skip the giant email attachments—they’re slow, clog inboxes, and offer zero control. Instead, use a secure link from your cloud storage. This lets you control exactly who can view or download the recording. For a deeper dive, our guide on the best practices for video call recording covers more advanced sharing techniques.
Next up, a little cleanup. Nearly every recording has some dead air at the start or a bit of awkward fumbling at the end. Use any simple video editor to trim those parts out. It’s a small touch, but it makes the video feel much more professional and respects your viewer’s time by getting straight to the good stuff.
This whole process is becoming more critical by the day. The video conferencing market is expected to balloon from $7.0 billion in 2022 to $21 billion by 2032, driven by the need to capture and reuse what happens in meetings. With about 22% of the U.S. workforce in a hybrid model, these recordings are vital for training and keeping records.
Finally, do yourself a huge favor and generate a transcript. This is a game-changer. AI transcription tools can spit out a text version of your call in minutes. This lets team members quickly scan for keywords or read the content if they can't watch a video, making your recording infinitely more useful.
Common Questions About Recording Video Calls
Once you start recording video calls on a regular basis, you’ll quickly run into the same handful of questions. From figuring out the legal rules to wrestling with giant video files, everyone hits these bumps.
Let's walk through some of the most common issues and how to solve them like a pro.
Is It Legal to Record a Video Call?
This is easily the most important question, and the answer is: it depends on where everyone is located. Some places operate under “one-party consent,” which means as long as you are part of the conversation and consent to recording, you're in the clear. Other regions require “two-party consent” (or all-party consent), meaning you need explicit permission from everyone involved.
Since your meeting attendees could be anywhere in the world, the best-practice—and most ethical—approach is simple: always get consent.
Start your meetings by announcing that the call will be recorded. Thankfully, platforms like Zoom and Microsoft Teams usually do the heavy lifting for you by displaying a prominent "Recording in Progress" notification that no one can miss.
How Can I Improve Poor Audio Quality?
Terrible audio will ruin an otherwise perfect recording. The usual suspect? Your laptop's built-in microphone. It's notorious for picking up every distracting sound, from your keyboard tapping to the whir of its own fan.
The single best thing you can do is get an external USB microphone. You don't need a professional studio setup; even a basic model will deliver a massive improvement in clarity.
A few other tips from my experience:
- Find a quiet space. Rooms with soft surfaces like carpets, curtains, or even a bookshelf help deaden echo and absorb ambient noise.
- Embrace the mute button. Ask everyone to mute their mics when they aren't talking. This small habit cuts out a surprising amount of background chatter.
- Double-check your inputs. Before you hit record, pop into your software’s settings and make sure the correct microphone is actually selected. It's a simple step that's easy to forget.
What Should I Do with a Huge Recording File?
High-definition video creates enormous files. They eat up storage space and are a nightmare to share. You have a couple of solid options here.
First, you can shrink the file size. A free tool like HandBrake is fantastic for compressing video without making it look pixelated or blurry.
When it's time to share, don't even think about email attachments. Upload the video to a cloud service like Google Drive or a dedicated video host like Vimeo, then share the link. It's faster, more secure, and won't crash anyone’s inbox.
Finally, one of the most powerful things you can do with a recording is turn it into a written document. Learning how to transcribe audio to text unlocks its value, making your conversation searchable, skimmable, and far more accessible for everyone.
Ready to move beyond basic recording and capture crystal-clear video calls with total control? Screendesk offers advanced features that let you record any call in high definition, edit your videos, and share them securely with your team. Try Screendesk today to see how easy professional video recording can be.