
The Foundation of Effective Jira Bug Reports
Effective Jira bug reports are essential for efficient software development. A well-written report saves developers time, reduces frustration, and leads to faster resolutions. Conversely, poorly written reports cause confusion and slow down the entire development process. Investing time in clear and concise bug reports is a direct investment in your project's success.
Understanding Jira Issue Types
Jira uses a structured approach to issue tracking with different issue types, each designed for a specific purpose. Using the correct issue type is crucial for organizing your workflow and ensuring information goes to the right place. A "Task" might track a small development item, while a "Story" outlines a larger user-centric feature. For documenting defects, the "Bug" issue type is essential. It includes specific fields for capturing the information developers need to understand and fix a bug. Misclassifying a bug as another issue type results in lost information and resolution delays.
The Importance of Proper Bug Classification
Proper classification involves more than just selecting the "Bug" issue type. It also means accurately assigning severity and priority levels. These classifications help development teams understand the impact and urgency of each bug. A major bug might significantly impair functionality, while a blocker bug could completely halt progress. For instance, a major bug might prevent a user from completing an action, while a blocker bug could make the entire application unusable. Learn more in this article about How to master bug reporting in Jira.
Understanding these classifications helps teams prioritize their work and address the most critical issues first. Knowing the impact of each severity level is also important. Data reveals that in 2025, approximately 68% of reported Jira issues were classified as major, 22% as critical, 6% as minor, and only 2% as blockers. This data emphasizes the importance of accurate bug categorization for effective resource allocation. More detailed statistics can be found here. You might also find this article helpful: How to master bug reporting forms. Properly categorized bugs in Jira keep the development process organized and efficient.
Crafting Bug Reports That Actually Get Fixed
What separates a Jira bug report that gets swiftly addressed from one that sits stagnant in the backlog? It all comes down to the quality of the report. A well-crafted report provides a clear path for developers, guiding them directly to the issue and giving them the information they need for a fast fix. This section breaks down the essential components of an effective bug report, turning you into a bug reporting expert.
Writing an Effective Summary
The summary is the first thing a developer sees, and often the only thing they see when initially evaluating bugs. It needs to be concise and informative, clearly stating the problem without unnecessary details. Think of it like a compelling headline – it should capture the core issue in just a few words. For example, "Login button unresponsive on Chrome browser" is much more effective than "Something's wrong with the login button."
Describing the Bug in Detail
While the summary gives a quick overview, the description field is where you provide all the important context. This is where you tell the complete story of the bug. Start by outlining the expected behavior compared to the actual behavior. This contrast clearly highlights the discrepancy. Include specific details about the environment, like the operating system, browser version, and any relevant hardware information.
Documenting Reproduction Steps
Providing clear reproduction steps is the cornerstone of any good bug report. These steps should be precise enough that anyone can follow them and encounter the same bug. Imagine it as a detailed recipe – each step must be listed in order. Begin with the starting conditions, outline every action taken, and describe the resulting bug. For more guidance, check out this helpful resource: How to master writing better bug reports.
Including Visual Evidence
Visual evidence, such as screenshots or screen recordings, significantly accelerates the debugging process. A screenshot can clearly identify the location of a visual problem. A recording, on the other hand, demonstrates a series of actions that cause a bug. Use annotations to highlight specific areas within the visual. Understanding the difference between a bug and a feature is also vital in Jira. Learn more about this key distinction here: bug vs feature.
Providing System Information
Including detailed system information helps developers recreate the bug in their own environment. This might include the browser version, operating system, device type, or any relevant software versions. The more pertinent details you provide, the less time developers spend trying to reproduce the issue, leading to faster resolutions.
To help you craft the perfect bug report, we've put together a handy table outlining all the critical components:
Introducing the table below, we present a helpful guide for creating robust bug reports in Jira. This table details each component, its purpose, and best practices to follow, as well as common mistakes to avoid.
| Component | Purpose | Best Practices | Common Mistakes |
|---|---|---|---|
| Summary | Briefly and clearly state the problem | Use concise language, focus on the core issue, avoid jargon | Vague descriptions, unnecessary details, missing keywords |
| Description | Provide detailed context and background information | Explain expected vs. actual behavior, include environment details, steps to reproduce | Lack of context, insufficient information, unclear explanations |
| Reproduction Steps | Outline the exact steps to recreate the bug | Provide clear, sequential instructions, start with initial conditions, specify actions and results | Missing steps, ambiguous instructions, assuming prior knowledge |
| Visual Evidence | Provide visual proof of the bug | Include screenshots or recordings, use annotations to highlight issues, explain the visual context | Missing visuals, unclear visuals, irrelevant visuals |
| System Information | Provide technical details about the environment | Include browser version, OS, device type, software versions | Missing information, inaccurate information, outdated information |
This table offers a practical checklist for ensuring your Jira bug reports are comprehensive and actionable. By following these guidelines, you’ll equip developers with the information they need to address bugs quickly and efficiently.

Customizing Jira Templates for Maximum Efficiency
Tired of repetitive data entry and incomplete Jira bug reports? Leading QA teams avoid these headaches by customizing Jira templates to maximize efficiency. This customization allows for capturing essential information, reducing redundancy, and ultimately streamlining the bug reporting workflow. This isn't about complex admin tasks; even small tweaks can yield significant improvements.
Tailoring Fields for Your Team's Needs
Jira's default fields might not always capture all the information your team needs for efficient bug resolution. This is where custom fields become invaluable. For example, if your team regularly works with different software versions, a custom field for "Software Version" ensures this crucial detail is always included in the bug report. This prevents developers from having to hunt down this information later.
Additionally, consider adding fields for specific project details, hardware configurations, or user roles, depending on your team's specific requirements. Tailoring these fields ensures the reports contain all the relevant information from the outset.
Implementing Validation Rules
Data quality is just as crucial as having the right data in the first place. Validation rules within Jira ensure submitted bug reports contain necessary information in the correct format. For instance, you can implement a rule requiring the "Steps to Reproduce" field to be completed before a bug report can be submitted.
This simple step ensures developers always have the reproduction steps needed to replicate and address the issue, cutting down on back-and-forth communication.
Designing Intuitive Workflows
A smooth workflow guides reporters through the process and ensures Jira bug reports are handled efficiently. Consider a clear progression from "Open" to "In Progress," to "Resolved," and finally "Closed." This provides clear visibility into the status of each bug. You might be interested in: How to master issue reporting templates.
Within these stages, consider additional statuses like "Pending Verification" or "Awaiting Deployment" for a more granular view of progress. This level of detail keeps everyone informed and allows for better tracking.
Using Conditional Logic for Dynamic Forms
Conditional logic adds another layer of efficiency by dynamically showing fields based on selections in other fields. For instance, if a bug report is categorized as a "Visual Bug," a field for attaching screenshots automatically appears.
However, if the bug is classified as a "Functional Bug," this field might be hidden, while other relevant fields, like "Expected Behavior," become mandatory. This ensures reporters see only relevant fields, simplifying the reporting process and improving data quality. These customizations transform Jira bug reports from a tedious chore into a powerful tool for driving efficient bug resolution.
Severity vs. Priority: Making the Right Call Every Time
Understanding the difference between severity and priority is key for effective bug management in Jira. While related, they represent distinct aspects of a bug. Severity describes the technical impact of the bug—how much it affects the software's functionality. Priority, on the other hand, reflects the business importance of the bug—how urgently it needs fixing.
Defining Severity Levels
Severity levels categorize bugs based on their technical impact, from minor visual glitches to complete system failures.
-
Low severity: A minor typo or a slightly misaligned image. These have minimal impact on the user experience.
-
Medium severity: Affects a specific feature but still allows users to continue using the application.
-
High severity: Significant problems that disrupt core functionality, but the software remains usable.
-
Critical severity: A complete system crash or data loss. These are the most severe and demand immediate attention.
Understanding Priority Levels
Priority, often determined by product owners or project managers, represents the urgency of fixing a bug from a business perspective.
-
Low priority: A minor cosmetic issue that doesn't significantly impact the user experience or business goals.
-
Medium priority: Bugs that should be addressed, but don't pose an immediate threat.
-
High priority: Requires prompt attention due to potential impact on user satisfaction or revenue.
-
Critical priority: Demands immediate action, as it could seriously damage the business.
Balancing Severity and Priority
Balancing severity and priority is a key aspect of effective Jira bug reporting. A high-severity bug might not always be high-priority. For example, a crash in a rarely used feature might be high severity but low priority. Conversely, a minor typo on the main landing page might be low severity but high priority due to its high visibility.
To illustrate the relationship between severity and priority, let's look at the following table.
This table, "Bug Severity vs. Priority Matrix," illustrates how to match bug severity levels with appropriate priority rankings based on business impact and technical considerations.
| Severity Level | Technical Impact | Recommended Priority | Response Timeframe |
|---|---|---|---|
| Low | Minor visual or functional glitch; no workflow disruption | Low | Within a week |
| Medium | Affects specific features; workaround available; moderate user impact | Medium | Within 2-3 days |
| High | Major functionality impaired; no workaround; significant user impact | High | Within 24 hours |
| Critical | System crash, data loss, security breach; blocks core workflows | Critical | Immediately |
As this table demonstrates, the recommended priority takes into account both the technical impact and the potential business consequences. A critical severity bug will always have a critical priority, while the priority of other severity levels can vary.
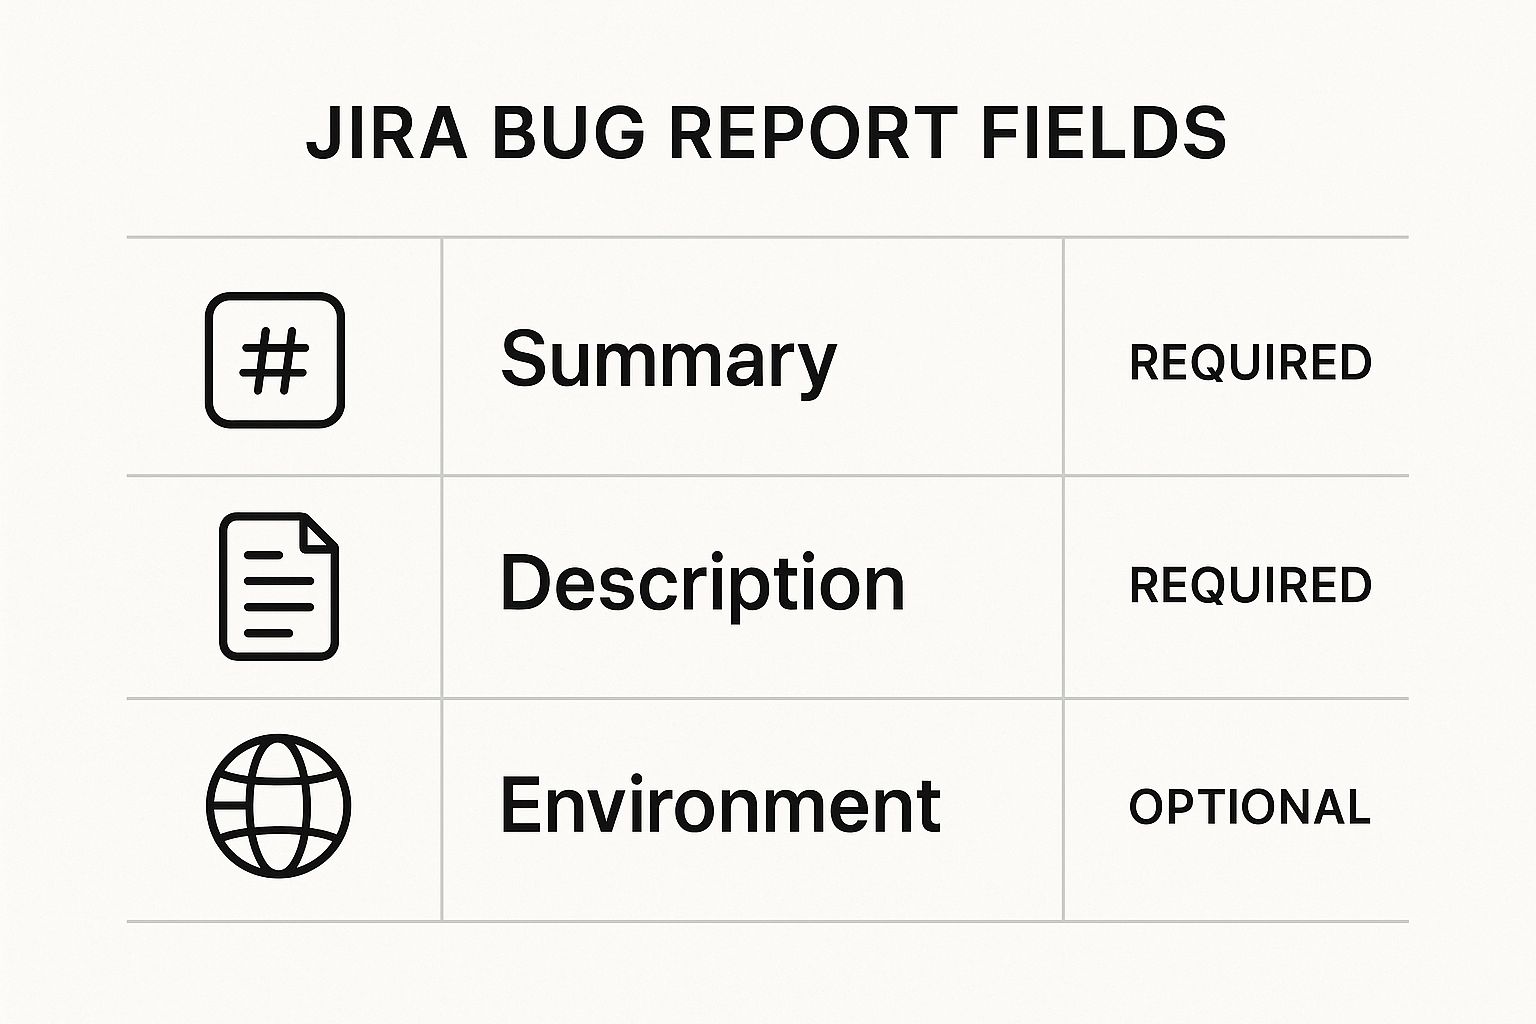
The infographic above visualizes required and optional fields in a Jira bug report. The summary and description are mandatory, providing the foundation of every report. The environment field, while optional, offers valuable context for developers.
Effective communication and collaboration between QA, development, and product management are crucial for making informed decisions about severity and priority. Jira's reporting capabilities provide valuable insights into bug trends, enabling teams to identify patterns and improve software quality management. Learn more about Jira's reporting capabilities here. This data-driven approach helps prioritize bug fixes, allocate resources, and ultimately deliver a better product.
Visual Evidence That Speaks Louder Than Words
A picture is worth a thousand words, and in the context of Jira bug reports, a screenshot or screen recording can save countless hours of back-and-forth communication. Visual documentation clarifies complex issues, helping developers understand bugs faster. This section explores how to effectively use visual evidence to enhance your Jira reports.
Capturing the Perfect Screenshot
Screenshots are ideal for highlighting visual bugs such as layout issues, broken UI elements, or incorrect text rendering. Use a dedicated screenshot tool like Snagit or Greenshot, rather than a simple print screen. These tools offer features for capturing specific windows, regions, or even scrolling web pages. This precision allows you to focus on the problem area, avoiding unnecessary visual information in the Jira bug report.

Creating Concise Screen Recordings
While screenshots capture a single moment, screen recordings demonstrate dynamic issues or complex sequences of actions. Keep recordings concise, focusing on the steps to reproduce the bug. Tools like Loom or OBS Studio allow you to record your screen and voice simultaneously, providing a clear narrative of the bug's behavior. This helps developers understand the issue and its underlying cause.
Annotating Your Visuals
Annotations enhance your visual evidence, highlighting specific problem areas and providing further context. Use arrows, boxes, and text to draw attention to relevant parts of the image or recording. Many screenshot and screen recording tools have built-in annotation features. Highlighting a misaligned button or circling incorrect text directs the developer's attention to the problem. Tools that allow you to add comments to PDFs, like PDF.ai, can also be helpful.
Attaching Visuals in Jira
Attaching visuals to your Jira bug report is simple. Jira supports various file formats, making it easy to upload screenshots and recordings. Clearly label each file with a descriptive name indicating its content. Organize multiple visuals logically within the report. For example, group related screenshots and provide clear descriptions for each, explaining the context and highlighting key concerns. This organized approach makes it easier for developers to find the information they need.
Best Practices for Visual Evidence
Consider file size and resolution. Large files can slow down Jira, so optimize images and compress recordings without sacrificing clarity. Ensure your visuals meet accessibility requirements by providing alternative text descriptions for images and captions for videos. For example, a screenshot of a broken button might have the alternative text: "Screenshot showing the unresponsive 'Submit' button on the checkout page." Following these best practices makes your Jira bug reports clear, informative, and accessible. This collaborative approach facilitates quick and efficient resolutions. Learn more about Jira best practices with this resource on Jira bug reporting and issue reporting templates.
From Submission to Resolution: The Bug Lifecycle
Submitting a Jira bug report is the first step. What happens next is crucial for a quick and effective fix. This section explores the entire bug lifecycle, from initial report to final resolution. We'll also highlight how successful teams maintain momentum and keep everyone accountable.
Bug Triage: Getting the Bug to the Right People
Bug triage ensures issues get to the right developers quickly. This involves reviewing new Jira bug reports, verifying if they're valid, and assigning them to the correct team or person. During triage, the team clarifies the bug's description, reproduces the problem, and confirms its severity and priority. This focused approach prevents bugs from getting stuck in the backlog and helps address them promptly.
Establishing Clear Ownership and Accountability
Assigning a clear owner to each bug is essential. This prevents issues from being overlooked. The owner becomes responsible for guiding the bug through the resolution process, keeping stakeholders updated, and making sure it gets fixed. Clear ownership fosters accountability and eliminates confusion about responsibilities. This helps move bugs toward resolution quickly and efficiently.
Communication Strategies: Keeping Everyone Informed
Open communication throughout the bug lifecycle keeps everyone informed without overwhelming them. Use Jira's commenting feature to provide updates, ask for more information, or discuss solutions. Stakeholders often need to provide feedback during this cycle; one way is to add comments to PDF documents. The goal is to provide relevant updates at the right times, avoiding unnecessary notifications. This transparent communication improves collaboration and keeps everyone aligned.
Leveraging Jira Workflows for Visibility
Jira’s workflow states and transitions offer valuable insight into a bug’s progress. As a bug moves from "Open" to "In Progress," "Resolved," and finally "Closed," stakeholders can easily see its status. These clear transitions provide a visual representation of the bug’s journey, allowing for accurate tracking. This transparency helps manage expectations and keeps everyone aware of the current stage of resolution.
Automation for Efficiency
Jira’s automation capabilities can significantly reduce manual effort. You can automatically assign bugs based on their type, send notifications upon status changes, or even close resolved bugs after a set time. This automation frees up the team to focus on fixing bugs, not managing them.
Verification and Confirmation of Fixes
Robust verification processes ensure fixes work without causing delays. Before closing a Jira bug report, thoroughly test the fix in the original environment. This ensures the bug is entirely resolved. Testers should follow the original reproduction steps to confirm the fix addresses the root cause and doesn’t introduce new problems. This detailed verification prevents recurring issues and guarantees the bug is truly fixed.
Handling Complex Bugs and Multiple Iterations
Complex bugs often need several attempts to fix. Break down these issues into smaller, more manageable sub-tasks, each with its own owner and deadline. This simplifies tracking and accountability. For bugs requiring in-depth investigation, use Jira’s linking feature to connect related issues, creating a complete history of the resolution process. This history provides valuable context for future debugging.
Managing Duplicate Reports
Duplicate bug reports create unnecessary work and waste time. Use strategies to identify and merge duplicates, consolidating all relevant information into a single Jira bug report. Encourage reporters to search for existing bugs before submitting new ones, reducing the chance of duplicates. This proactive approach keeps the bug tracker organized.
Documenting Resolution Approaches
Documenting the resolution steps prevents future similar bugs and promotes knowledge sharing. Include details about the root cause, the implemented solution, and any workarounds. This documentation becomes a helpful resource for developers and support teams, allowing them to quickly address similar issues later. This saves time and reduces repeated effort.
Streamline your customer support and bug reporting with Screendesk, a video platform that integrates with your helpdesk. From screen recordings to live video calls, Screendesk helps your team resolve issues quickly and efficiently.